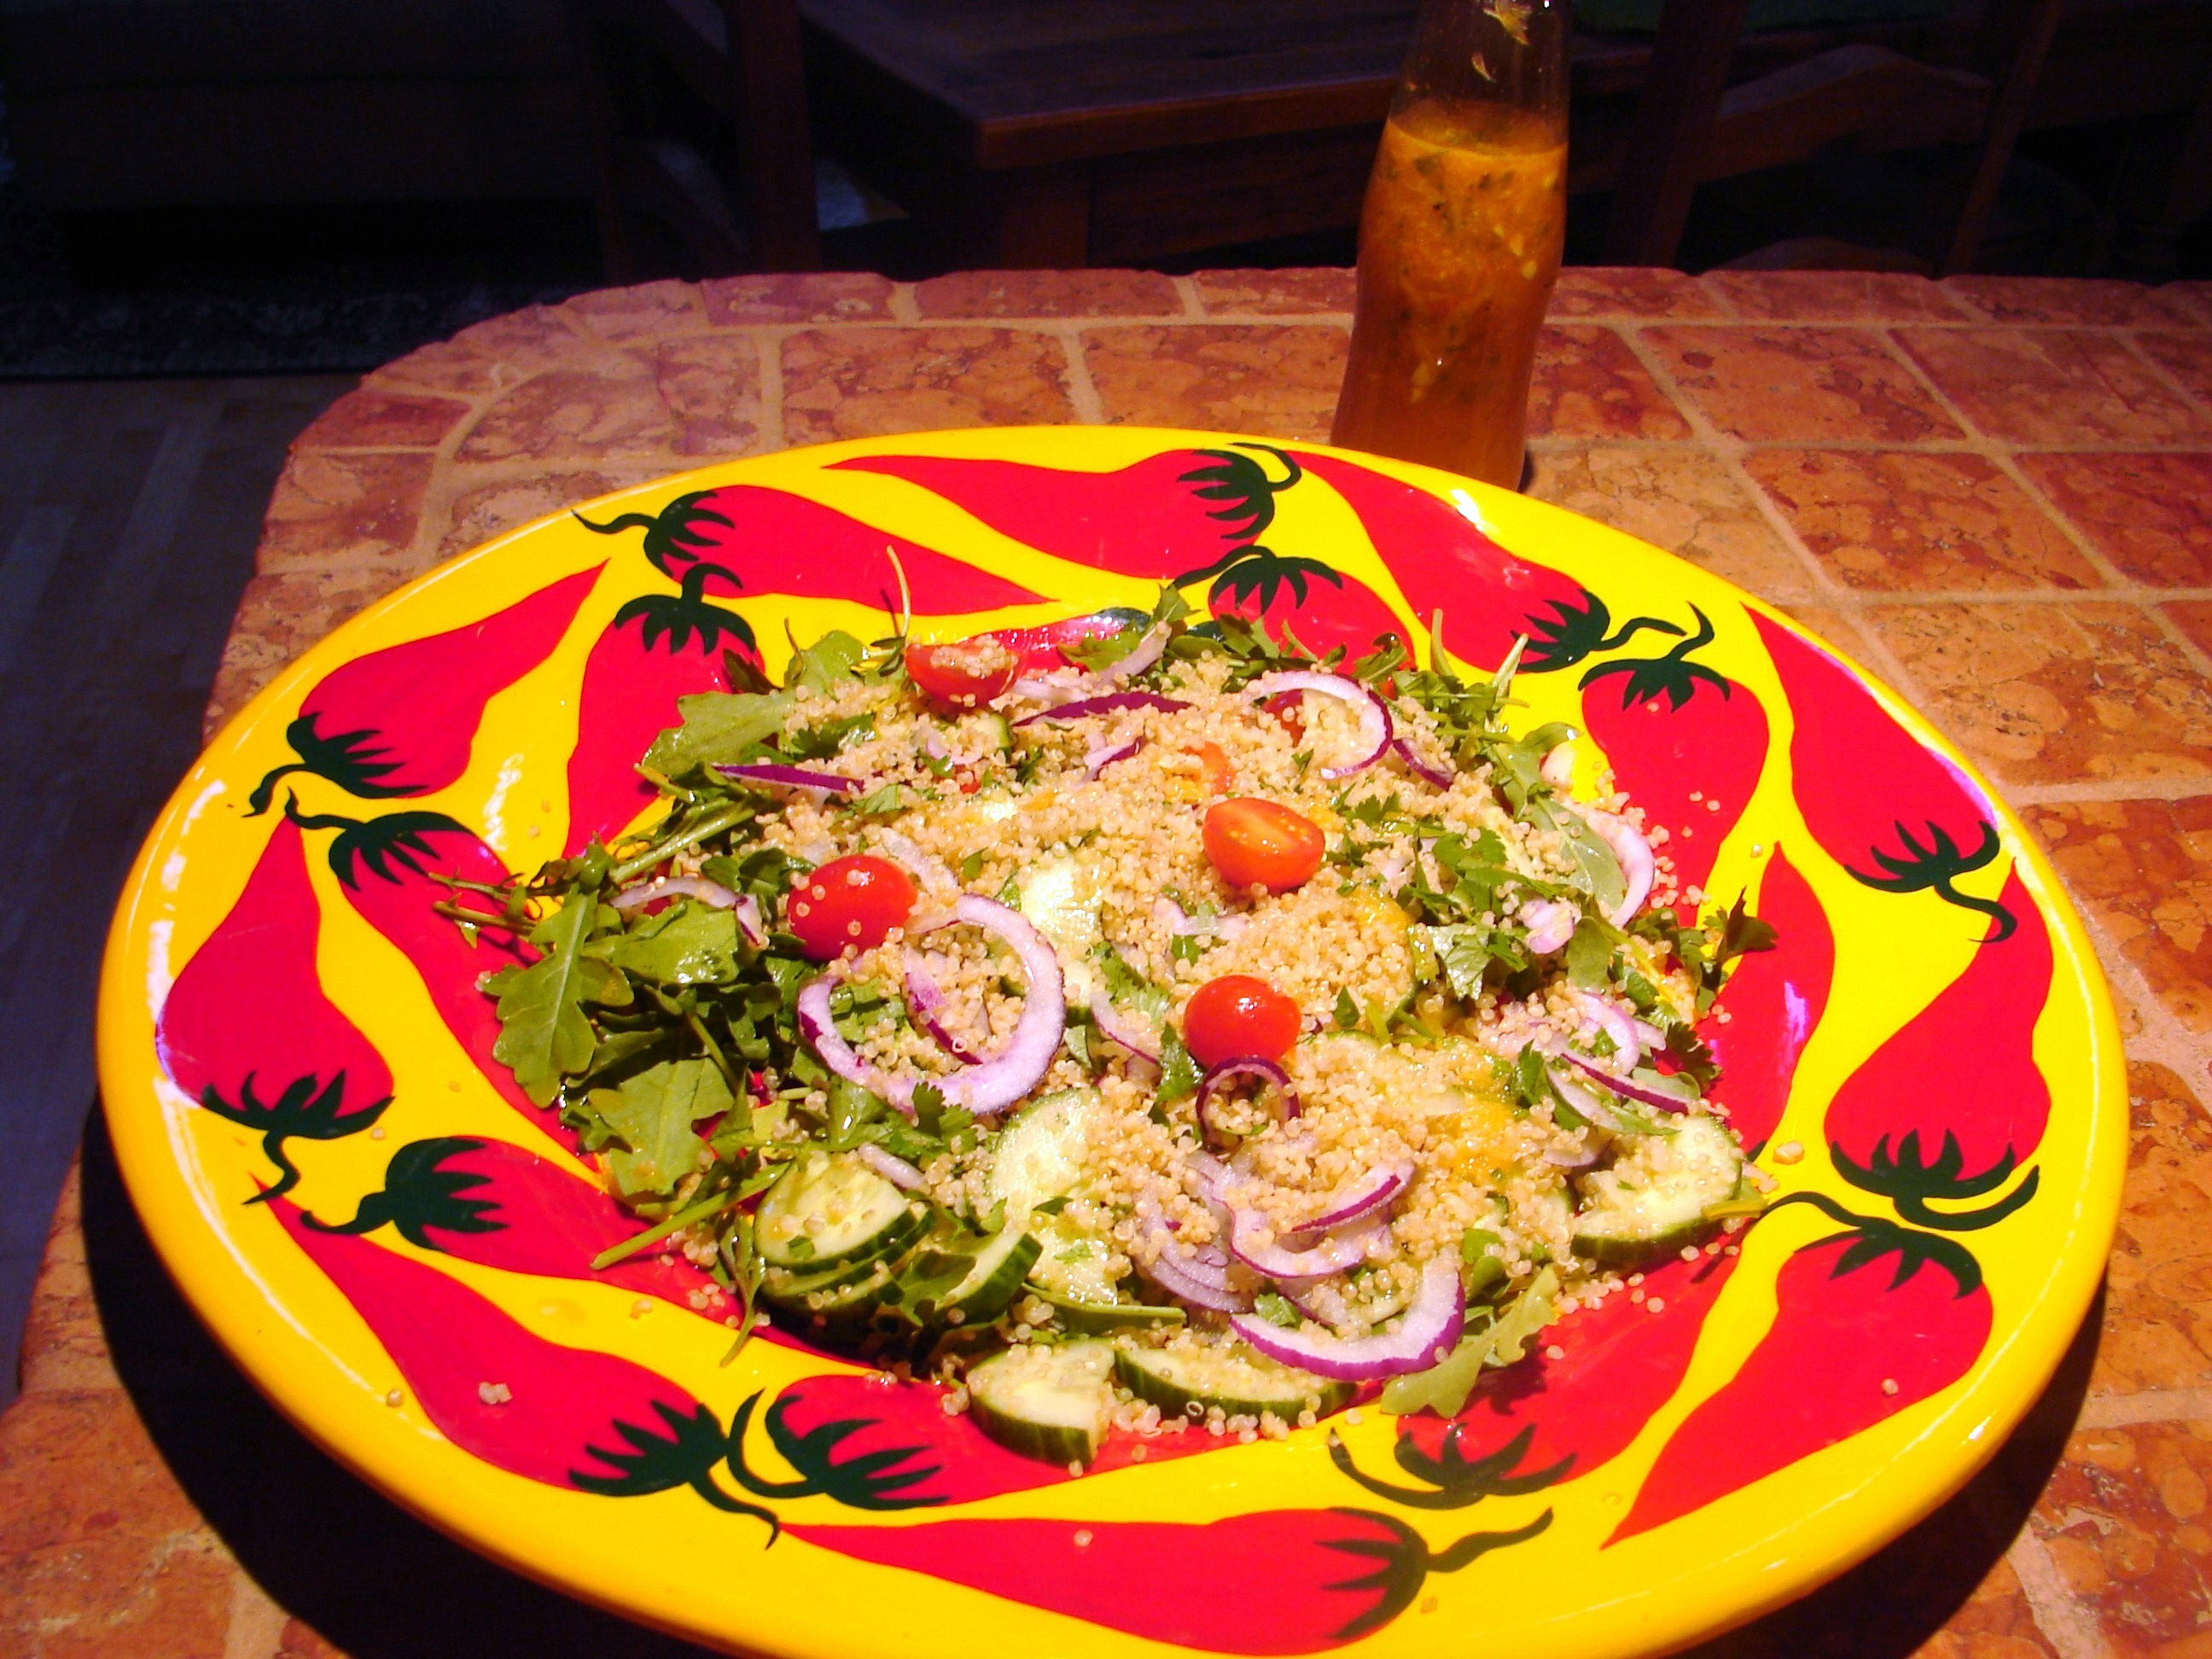
Have you ever used quinoa in a salad? If not, try this one. The combination of crunchy, soft, sweet & tart works really well here. This is a healthy AND delicious summer salad. It has a fresh flavor and the dressing has a sweet/sharp taste.
First rinse & drain 1 cup of quinoa. In a medium pot, bring 2 cups of water *(I prefer using chicken or veggie broth for added flavor), the quinoa, 1 tsp. extra virgin olive oil & a pinch of kosher salt to a boil. Cook like rice (ratio is 2-1) – reduce heat to low, cover and simmer until liquid is absorbed and quinoa is tender, about 15 to 20 minutes. Uncover, fluff with a fork, transfer to a plate or bowl, and set aside to let cool.
In a large bowl toss together – arugula, halved cherry tomatoes, ½ english cucumber, halved lengthwise and sliced, ½ small red onion, very thinly sliced & 1 diced mango. Add a bit of the dressing (1/4 cup or more).
Spoon quinoa over arugula salad, drizzle with a bit more dressing & sprinkle with chopped cilantro. Serve. Add more dressing as desired.
*TIP – for quinoa broth I use 2 cups of water and add 2 tsp. of organic “better than bouillon” reduced sodium chicken base or concentrated vegetable base. Either will give it loads of flavor. Available at whole foods or your local health food store.
Spicy Citrus Dressing
¾ freshly squeezed orange juice (from 2 or 3 oranges)
3 Tbsp. extra-virgin olive oil
3 Tbsp. freshly squeezed lemon juice (from 1 lemon)
1 ½ Tbsp. freshly squeezed lime juice (from 1 lime)
1 tsp. honey
1 tsp. red wine vinegar
1 clove of garlic, very finely chopped
1 small jalapeño, seeded & very finely chopped (if you don’t have jalapeño you can use a little cayenne)
½ tsp. ancho chile powder (optional)
½ tsp. kosher salt
freshly ground black pepper
In a medium bowl, whisk together all ingredients until well combined. Makes about 1 ¼ cups. Pour into a glass container & shake. You’ll have enough dressing leftover for another salad. You can also use it as a marinade for chicken or fish.
Here’s something you might not have thought of before but not only does it work – it works surprisingly WELL. One-Pan Pasta! (not to be confused with first cooking the spaghetti & tossing it in a pan of already made sauce a la Sopranos. Are you kidding? No need to over work yourself.
At the Start
There’s a tiny restaurant in the Puglia region of Italy where the chef places dried pasta in a skillet with water, tomatoes, onion, garlic, herbs and a glug of extra virgin olive oil.
Then he cooks everything together and it has become their house dish ever since.
I had to try it out myself because it seemed way too simple and I wasn’t sure how everything would turn out. So…
After laying out enough linguine for two people in a skillet, I added about 1 ½ cups of water – enough to just cover the pasta since there was no actual recipe. I added the above ingredients but instead of putting in fresh tomatoes I just used a can of peeled plum tomatoes with the juice. Also a bit of tomato paste as I thought there was a bit too much water at first, a sprinkling of hot pepper flakes & a squeeze of lemon.
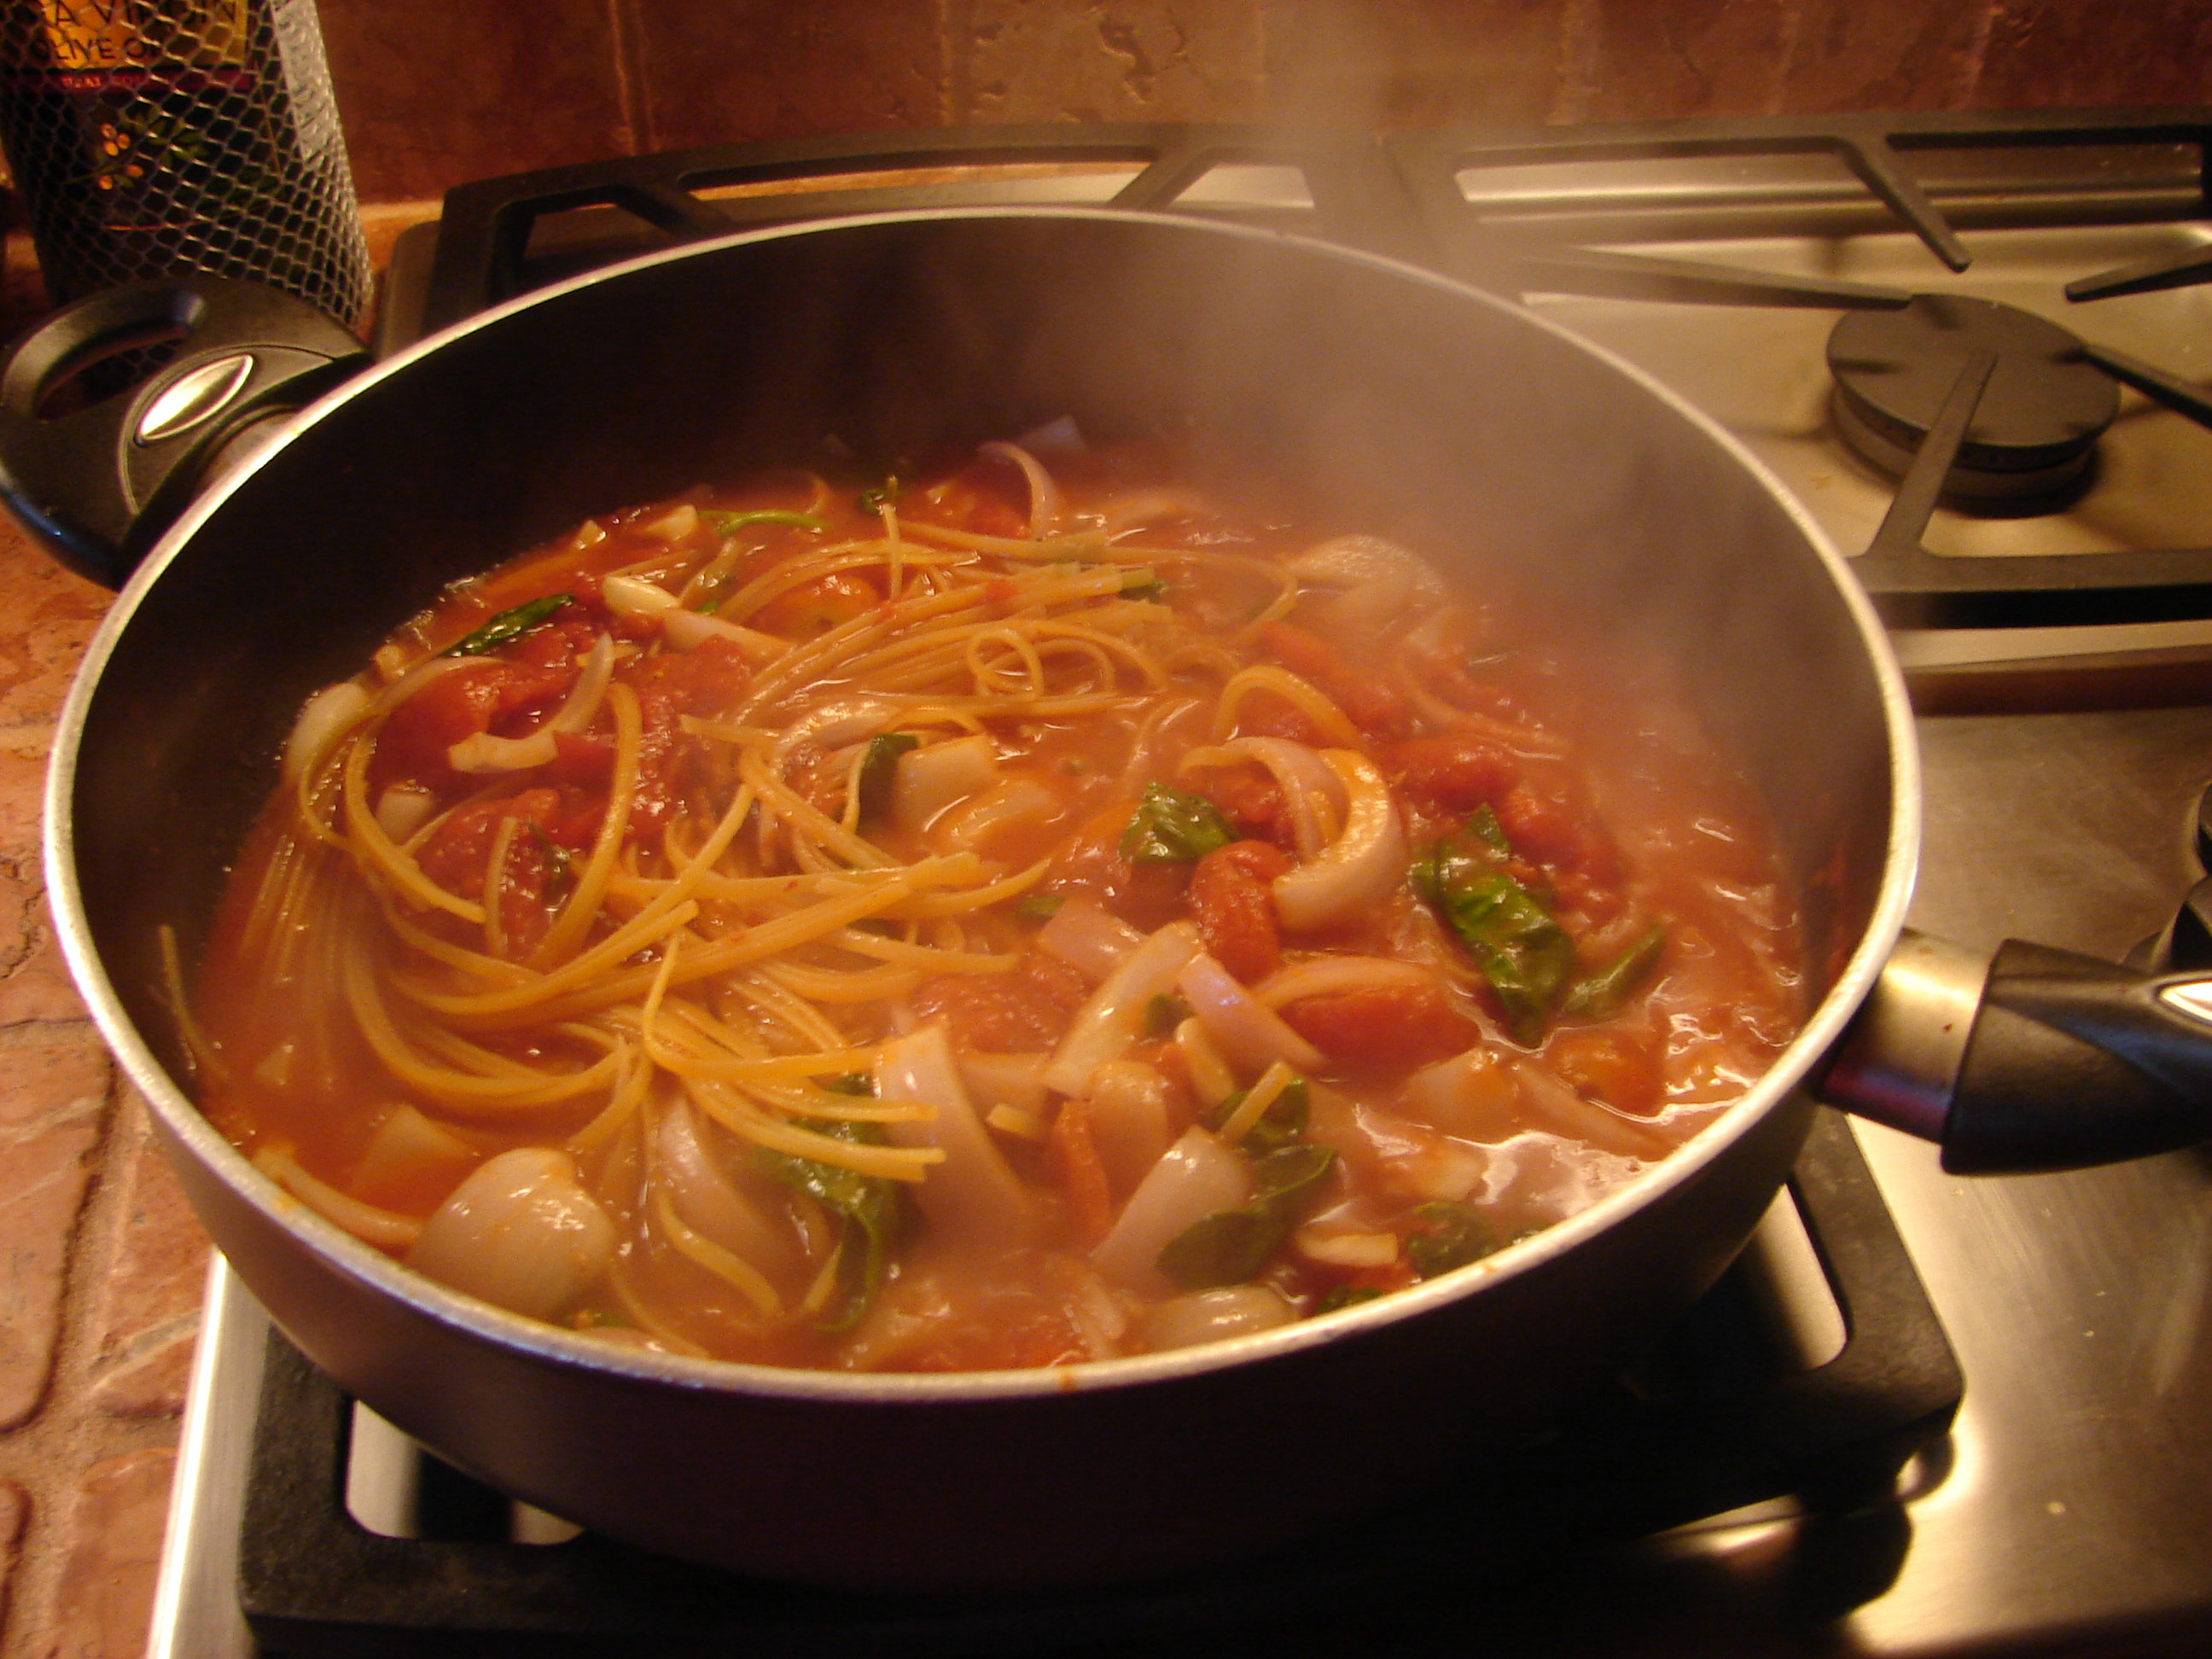
Almost Ready
Once the water had boiled away we were left with perfectly al dente pasta in a creamy sauce that coated every strand & tasted like something you would find in a restaurant in the tiny village of Puglia.
This is the perfect glamping dish, or for times when you don’t have too much time or just for those that love pasta (like me) and are always looking for new ways to cook it.
CUBAN CUISINE contains African, Spanish, Italian and Caribbean elements. The Cubans don’t follow any rules when cooking – the mixture of all possible tastes, smells and colors usually help to create little works of art. Cuba does not have a great reputation for their food – at least for tourists. I’ve been to Havana and found this to be true. Their rum however is second to none and if you stick with drinking mojitos all day long you may not even mind how bad the food tastes. The truth is if you’re lucky enough to be invited into a local home for a home cooked meal or go to one of the handful of local insider restaurants which happen to not be in the very touristy areas, you will be pleasantly surprised. Together with the wonderful herbs and spices from the region – for example, chilli, oregano, onions, garlic, parsley, saffron, basil, etc. – there are no limits to the varied dishes. Here is a simple and delicious marinade.
2 Tbsp. (30 ml) each frozen orange juice concentrate (somewhat defrosted), ketchup and molasses. (I used spicy ketchup from the Mcilhenny Co. brand that makes Tobasco).
1 tsp (5 ml) each ground cumin and dried oregano leaves
¼ tsp (1 ml.) cayenne pepper
2 garlic cloves, minced
1 lime
1 Tbsp (15 ml) Extra-Virgin Olive Oil
4 centre-cut pork loin chops, each about ½ inch (1 cm) thickl
¼ cup (50 ml) coarsely chopped cilantro
In a bowl, stir concentrate with ketchup, molasses, dried seasonings and garlic.
Squeeze in juice from lime, then stir in oil.
Pour three-quarters of the marinade over chops and turn to evenly coat. Cover and let marinate in the fridge for at least one hour but best overnight. Turn occasionally.
Refrigerate reserved marinade in a separate container.
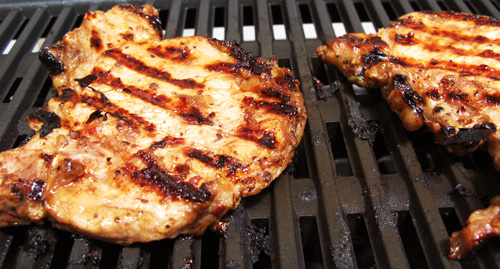
Preheat barbeque, then adjust to medium heat. Remove chops from marinade and discard marinade. Place on grill. Close lid and grill, about 12 to 15 minutes, turning once.
Brush with reserved marinade during the last five minutes of cooking time. Remove to platter and sprinkle with cilantro.
Per Serving: 237 calories
Sides: I served this with cooked quinoa (in a vegetable broth) which was then mixed into a pan with caramelized onions, shallots, red pepper, green beans & cuban black beans.
Sweet yellow corn on the cob with cilantro/chili/lime butter & sea salt.
No wonder top chefsswear by this staple – it retains heat and cooks food evenly. Plus, it can last a lifetime if you treat it properly (see 10 reasons to own one below).
Steak & Frites
Or mashed, boiled or baked.
This casual, simple and tasty meal adapted from a restaurant in Chicago calls for Flat Iron Steak but I’ve used it on other cuts like rib-eye and T-bone. Let steak reach room temperature prior to cooking so the center won’t be cold. After cooking, wait about five minutes before slicing to keep juices in. Serves 4. Pair with a hearty Shiraz or Cabernet – either will go well with this peppery steak.
3 Tbsp. olive oil, divided
1 tsp. each black pepper, smoked paprika, crushed fennel seeds and kosher salt.
4 flat iron (top chuck) steaks, about 1 ½ lb.
2 Tbsp. unsalted butter
Combine 1 Tbsp. olive oil with the seasonings. Spread paste over both sides of steak. Let sit 20 minutes. Heat remaining olive oil and butter in large skillet over medium-high heat. Cook steak 10-12 minutes, turning once or until instant-read thermometer registers 140F for medium-rare. Slice & pour sauce over top.
Crispy Salt and Vinegar Potatoes
Use Yukon Gold and slice as thinly as possible. Sprinkle with some sea salt & olive oil.
Spread on a cookie sheet and bake at 375F until cooked through and crispy – about ½ hour. Toss with some malt vinegar and chopped chives. Tip: Cook them as closely to serving time as possible so they don’t get soggy.
10 Reasons to Own a Cast Iron Skillet
1) Made of Iron. This thing is sturdy. You can drop it and it won’t be damaged. You don’t have to worry about scratching it or discolouring it (it’s black already you see). It’s possible that it can rust, but you can easily clean it. Cast iron skillets will take any and all abuse and still last forever. In fact, your skillet will probably outlast even you.
2) It Can Take The Heat. Most cookware comes with heat warnings. Even most stainless steel cookware isn’t supposed to go over 450/500 degrees in an oven. Cast iron? I mean… yea… eventually it’ll melt. But seriously you can cook on an open campfire with this thing. Try that with a non-stick pan. Oh wait. Don’t. I don’t want any lawsuits.
3) It’s Non-stick. Speaking of non-stick, cast iron skillets are non-stick if you season them correctly. Season your skillet by wiping it down with a thin layer of canola oil and then baking it in a 250 degree oven for about 90 minutes. Let it cool and wipe it down and this will be as good as any non-stick pan out there. Go ahead. Try a fried egg on it.
4) It’s a Grill. For the city folk, having a yard is not always an option. But because you can get a cast iron skillet really hot, it can effectively be used as a grill. For example, I cooked this steak in my cast iron and it was just as good as if it’d been cooked on a grill. Perfectly medium rare with a really nice crust.
5) It’s Economical. I think some people are actually turned off by cast iron because they think it’s cheap as in low quality. But the reality is that they just happen to be cheap to make which makes them economical, but not cheap. If you pay more than $40 for one, you are getting super-screwed. Not to mention that a lot of people sell perfectly good cast iron skillets at yard sales just because they don’t know how to season them.
6) It’s Versatile. You can make hundreds of completely delicious things in this one pan.
7) Save on Soap. Once your skillet is seasoned, it actually hurts it to wash it with soap. The soap will break up the tiny oil molecules that are embedded on the pan and make it not-so-non stick. It’s also possible that the next thing you cook it will have a slightly soapy taste to it! So save on the soap. If you need to scrub your cast iron pan, use salt!
8) It’s Vitamin Rich. This is a stretch, but since it’s made out of iron, a little bit of mineral iron does get transferred over during cooking.
9) Heat Distribution. This is maybe one of the most important reasons you should own one of these guys. People spend thousands on pots that evenly distribute heat. A cook’s nightmare is a pan with a really bad hot spot on it so half of your food is burned and the other half raw. Cast iron does such an amazing job of evenly distributing heat that you’ll never have this problem.
10) It’s Sexy. Call me crazy but I find these things kinda hot. There’s something rustic about them. Like a guy with a great beard. When you see someone working with a big heavy pan, it’s a turn on. Or at least… that’s what I tell myself.
The best way to care for your cast-iron pan
The trick to keeping cast iron in good shape: seasoning, a process that protects the metal from moisture (which can turn it rusty) and creates a non-stick surface. Lightly coat the bottom of your skillet with vegetable oil, heat over a medium flame, then dry with paper towels while the pan is still hot. The toast temp will help the porous metal absorb some of the oil. Each time you use and season the pan, you will be reinforcing the non-stick surface. When it comes to cleaning, steer clear of dish-washing soap, which can strip the coating. Instead, just wipe down the pan with paper towels before it cools. To loosen stuck-on-food or remove rust stains, heat the pan, cover the inside with oil and use a handful of coarse kosher salt, then scrub with an old dish towel. Give it a quick rinse with hot water, and dry immediately.
kind of crazy
Want something different for the person who has everything? Buy them a cast-iron pan in the shape of their home state (obviously USA customers only). You heard right.
Made-to-order cast-iron skillet at FeLion Studios, from $150/state – felionstudios.com
This first time I made this Tex-Mexspice rub I used it on chicken drumsticks which were barbequed but it would be good on pork as well. It tasted delicious and not overly spicy. At first I didn’t know exactly what to expect but the mix of cocoa powder and ground coffee beans together in one recipe was enough to make me want to try it out. After all what is better than coffee & chocolate with chicken?
But seriously I think you should try it. Makes 2 cups of spice blend mix.
½ cup chili powder
¼ cup paprika
1 Tbsp. ground cumin
1 tsp. garlic powder
1 tsp. red pepper flakes
2 tsp. salt
2 tsp. dried oregano
½ cup Cocoa powder (Try Trader Joe’s unsweetened or Fry’s)
1 Tbsp. ground coffee beans
Combine all ingredients in medium bowl; blend well. Place in airtight container which can be stored in a cool dry place for up to 4 months.
That make preparing a meal and your life so much easier.
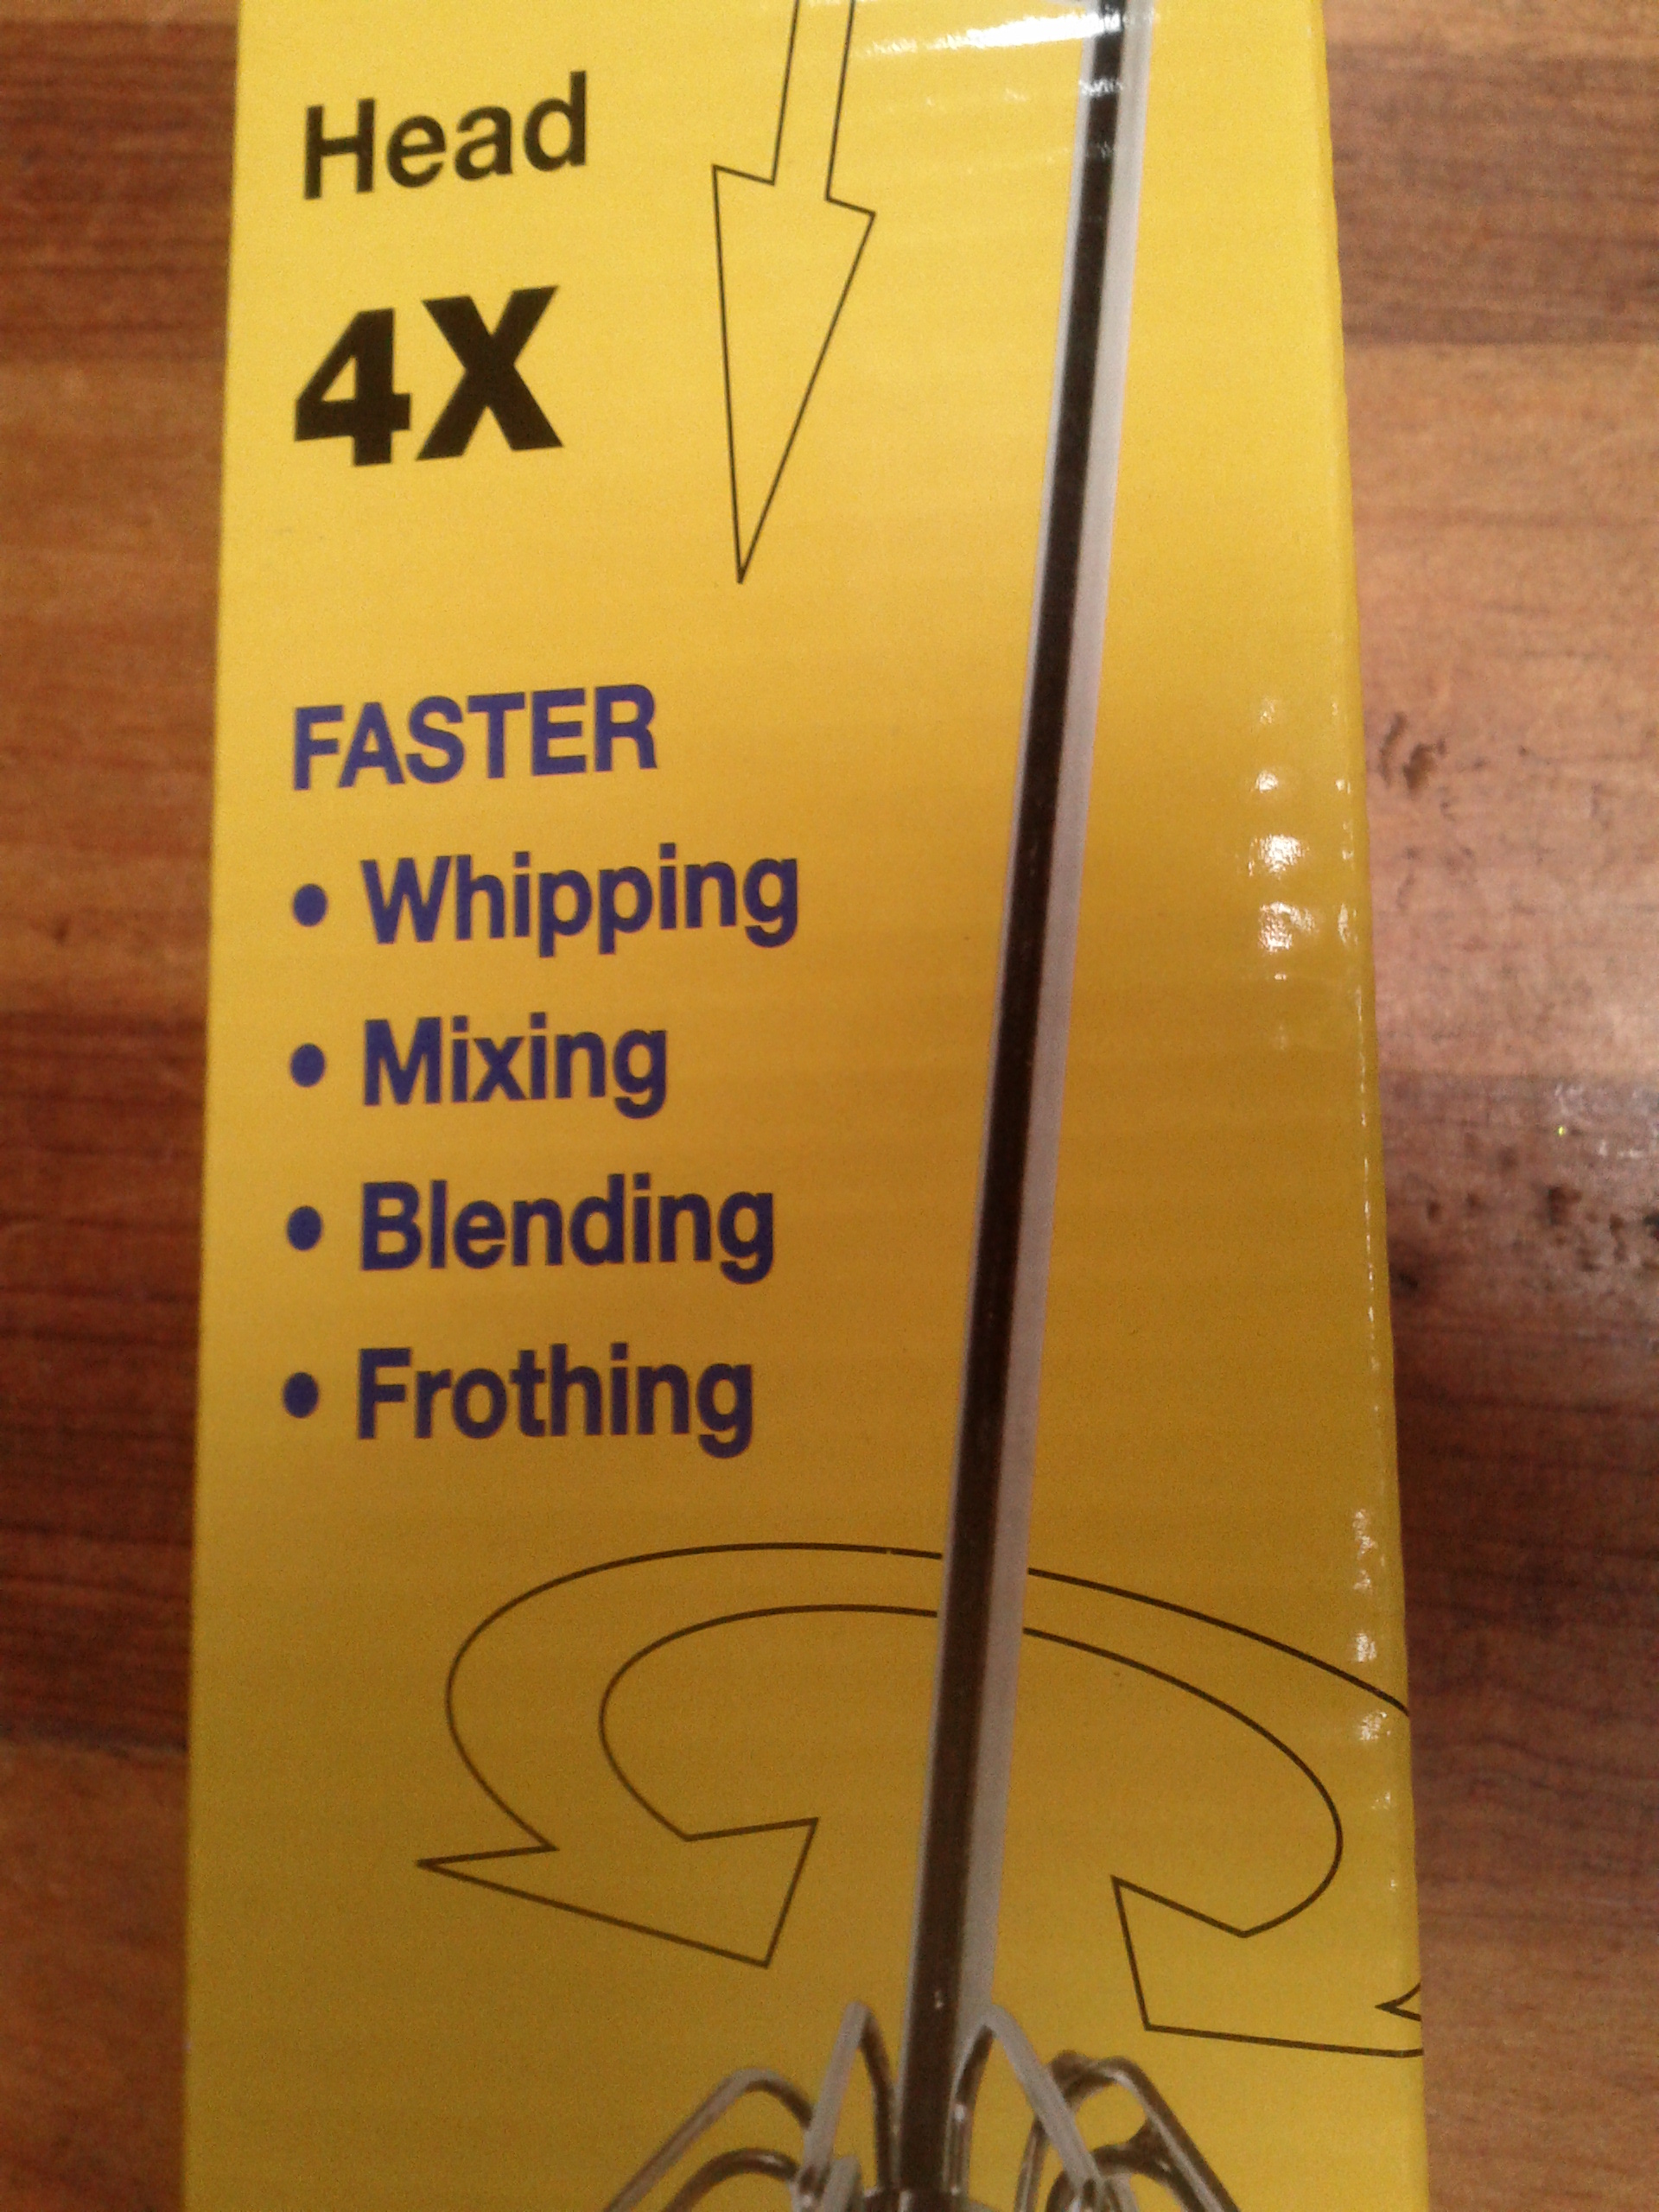
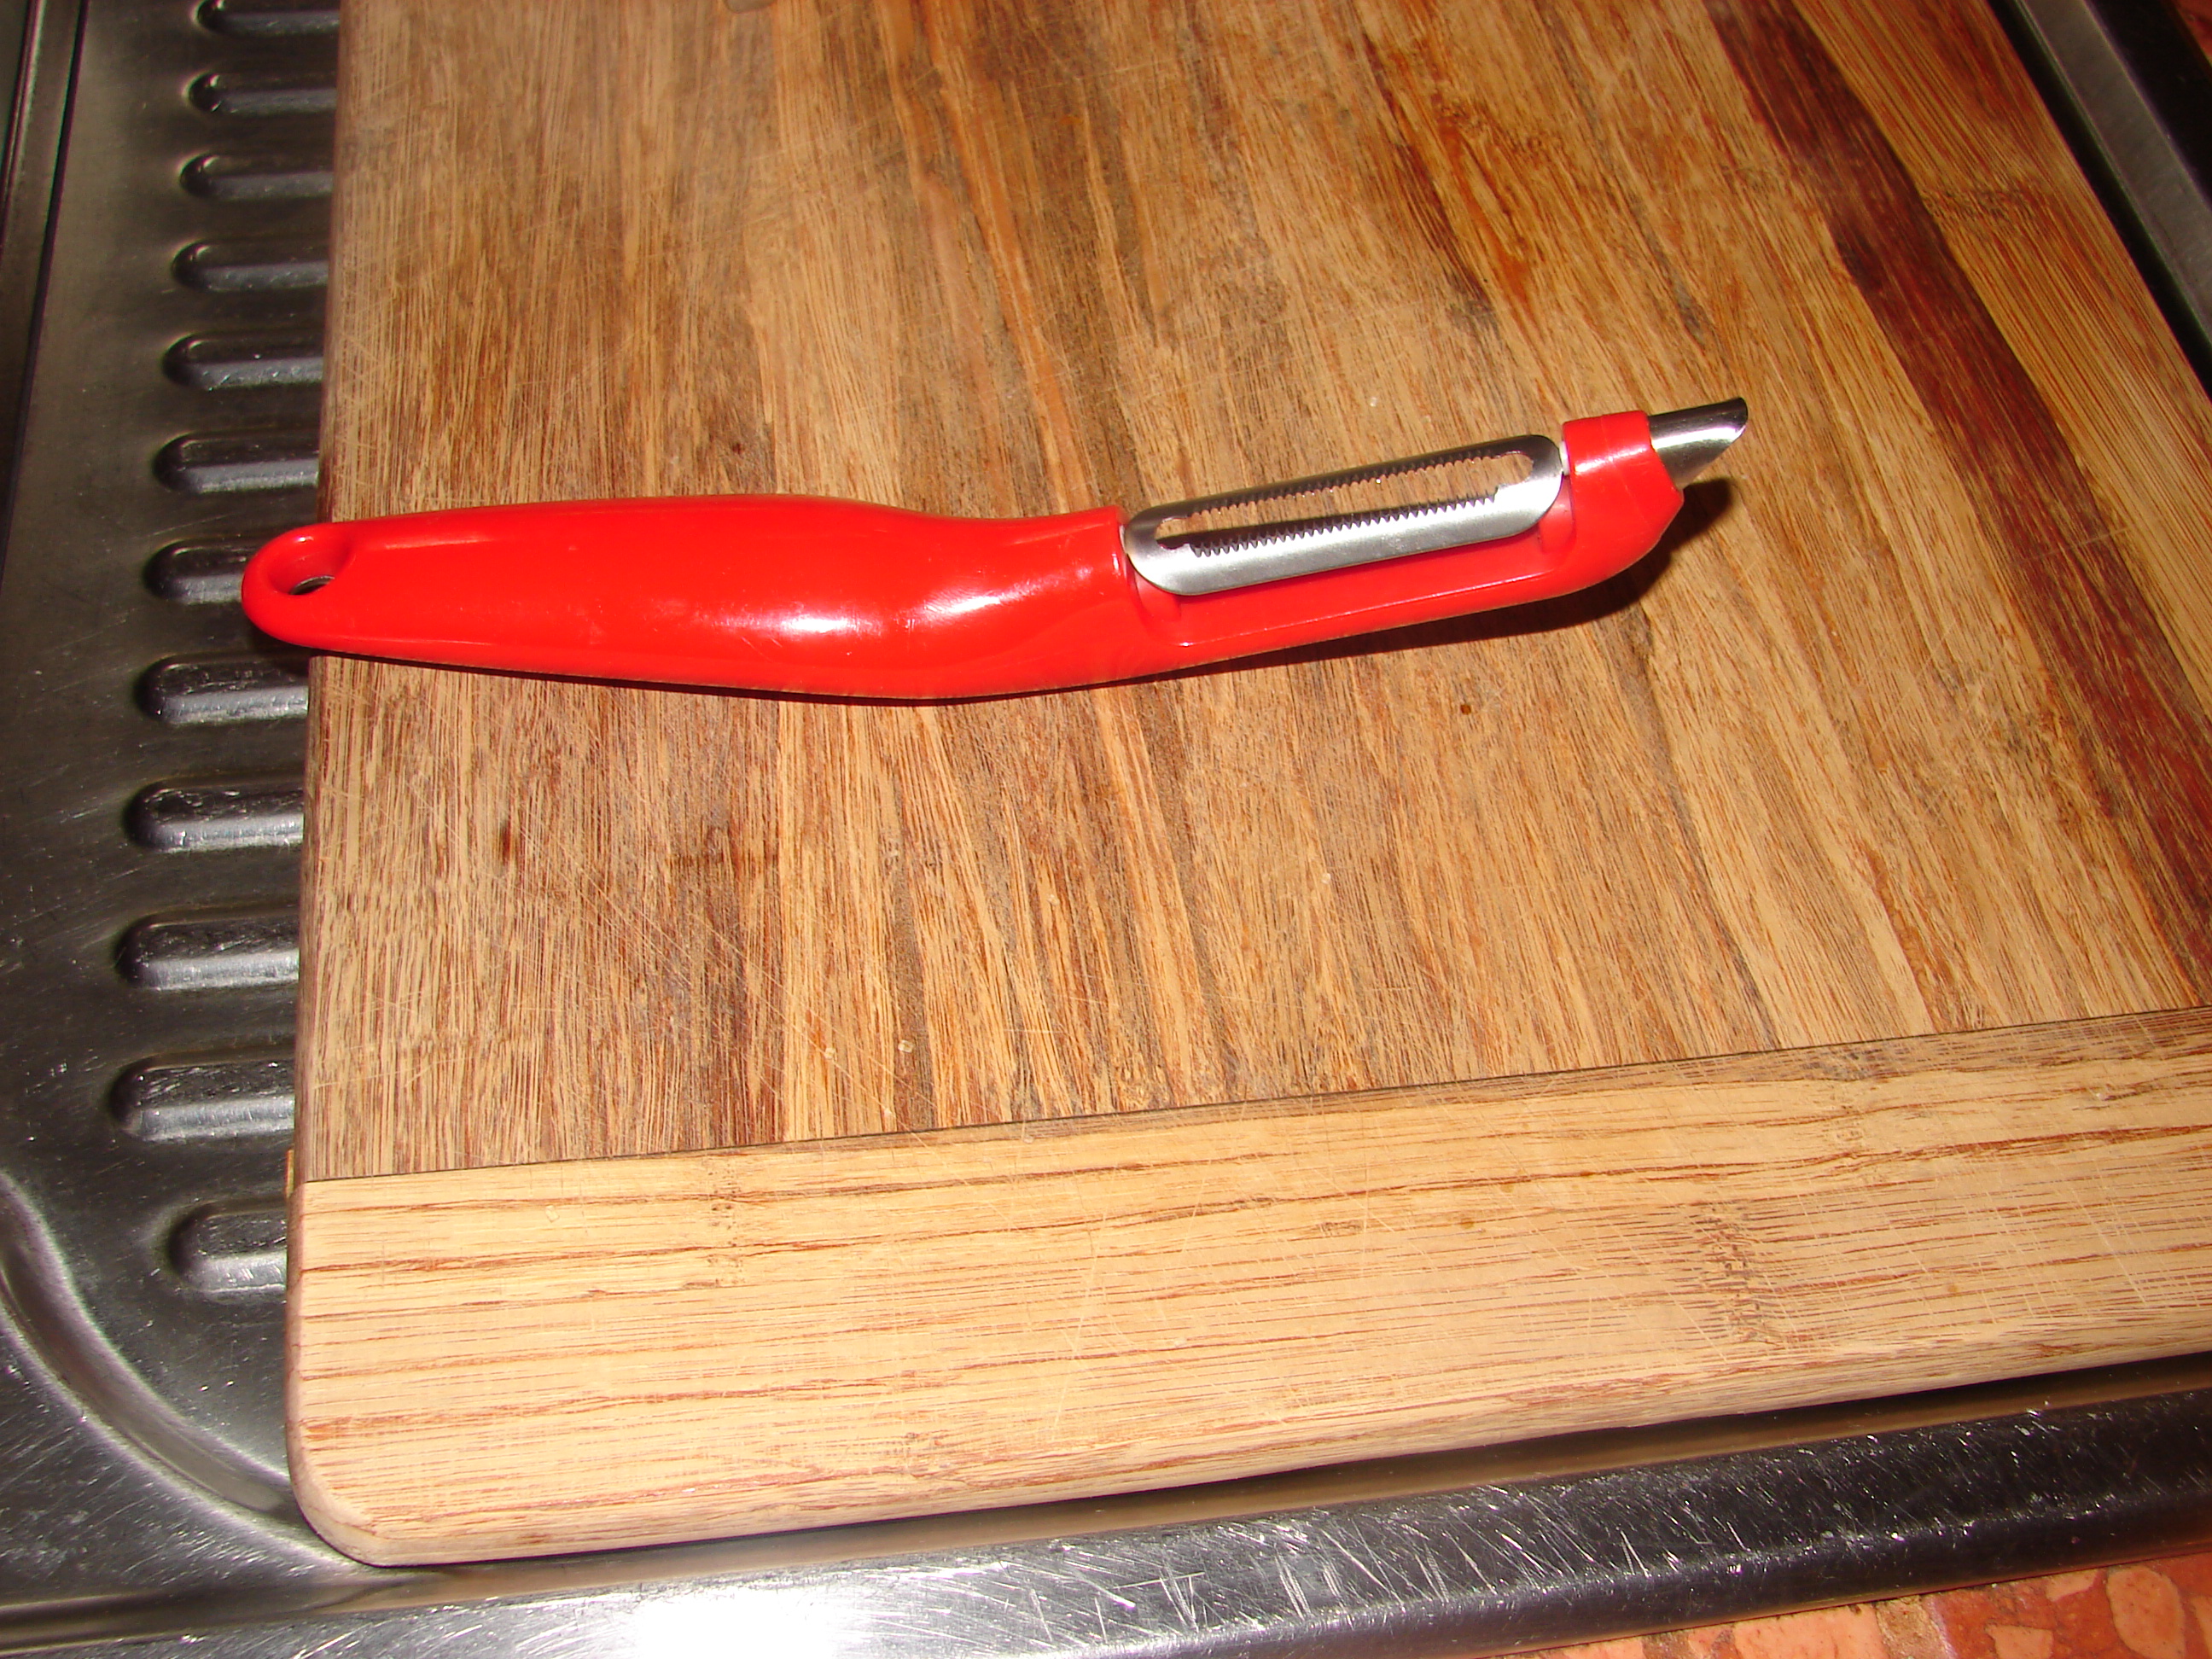
I don’t know about you but I like to simplify things in the kitchen as much as possible. These are my latest favorite kitchen tools. A whisk, a zester and a fruit/veggie peeler extraordinaire.
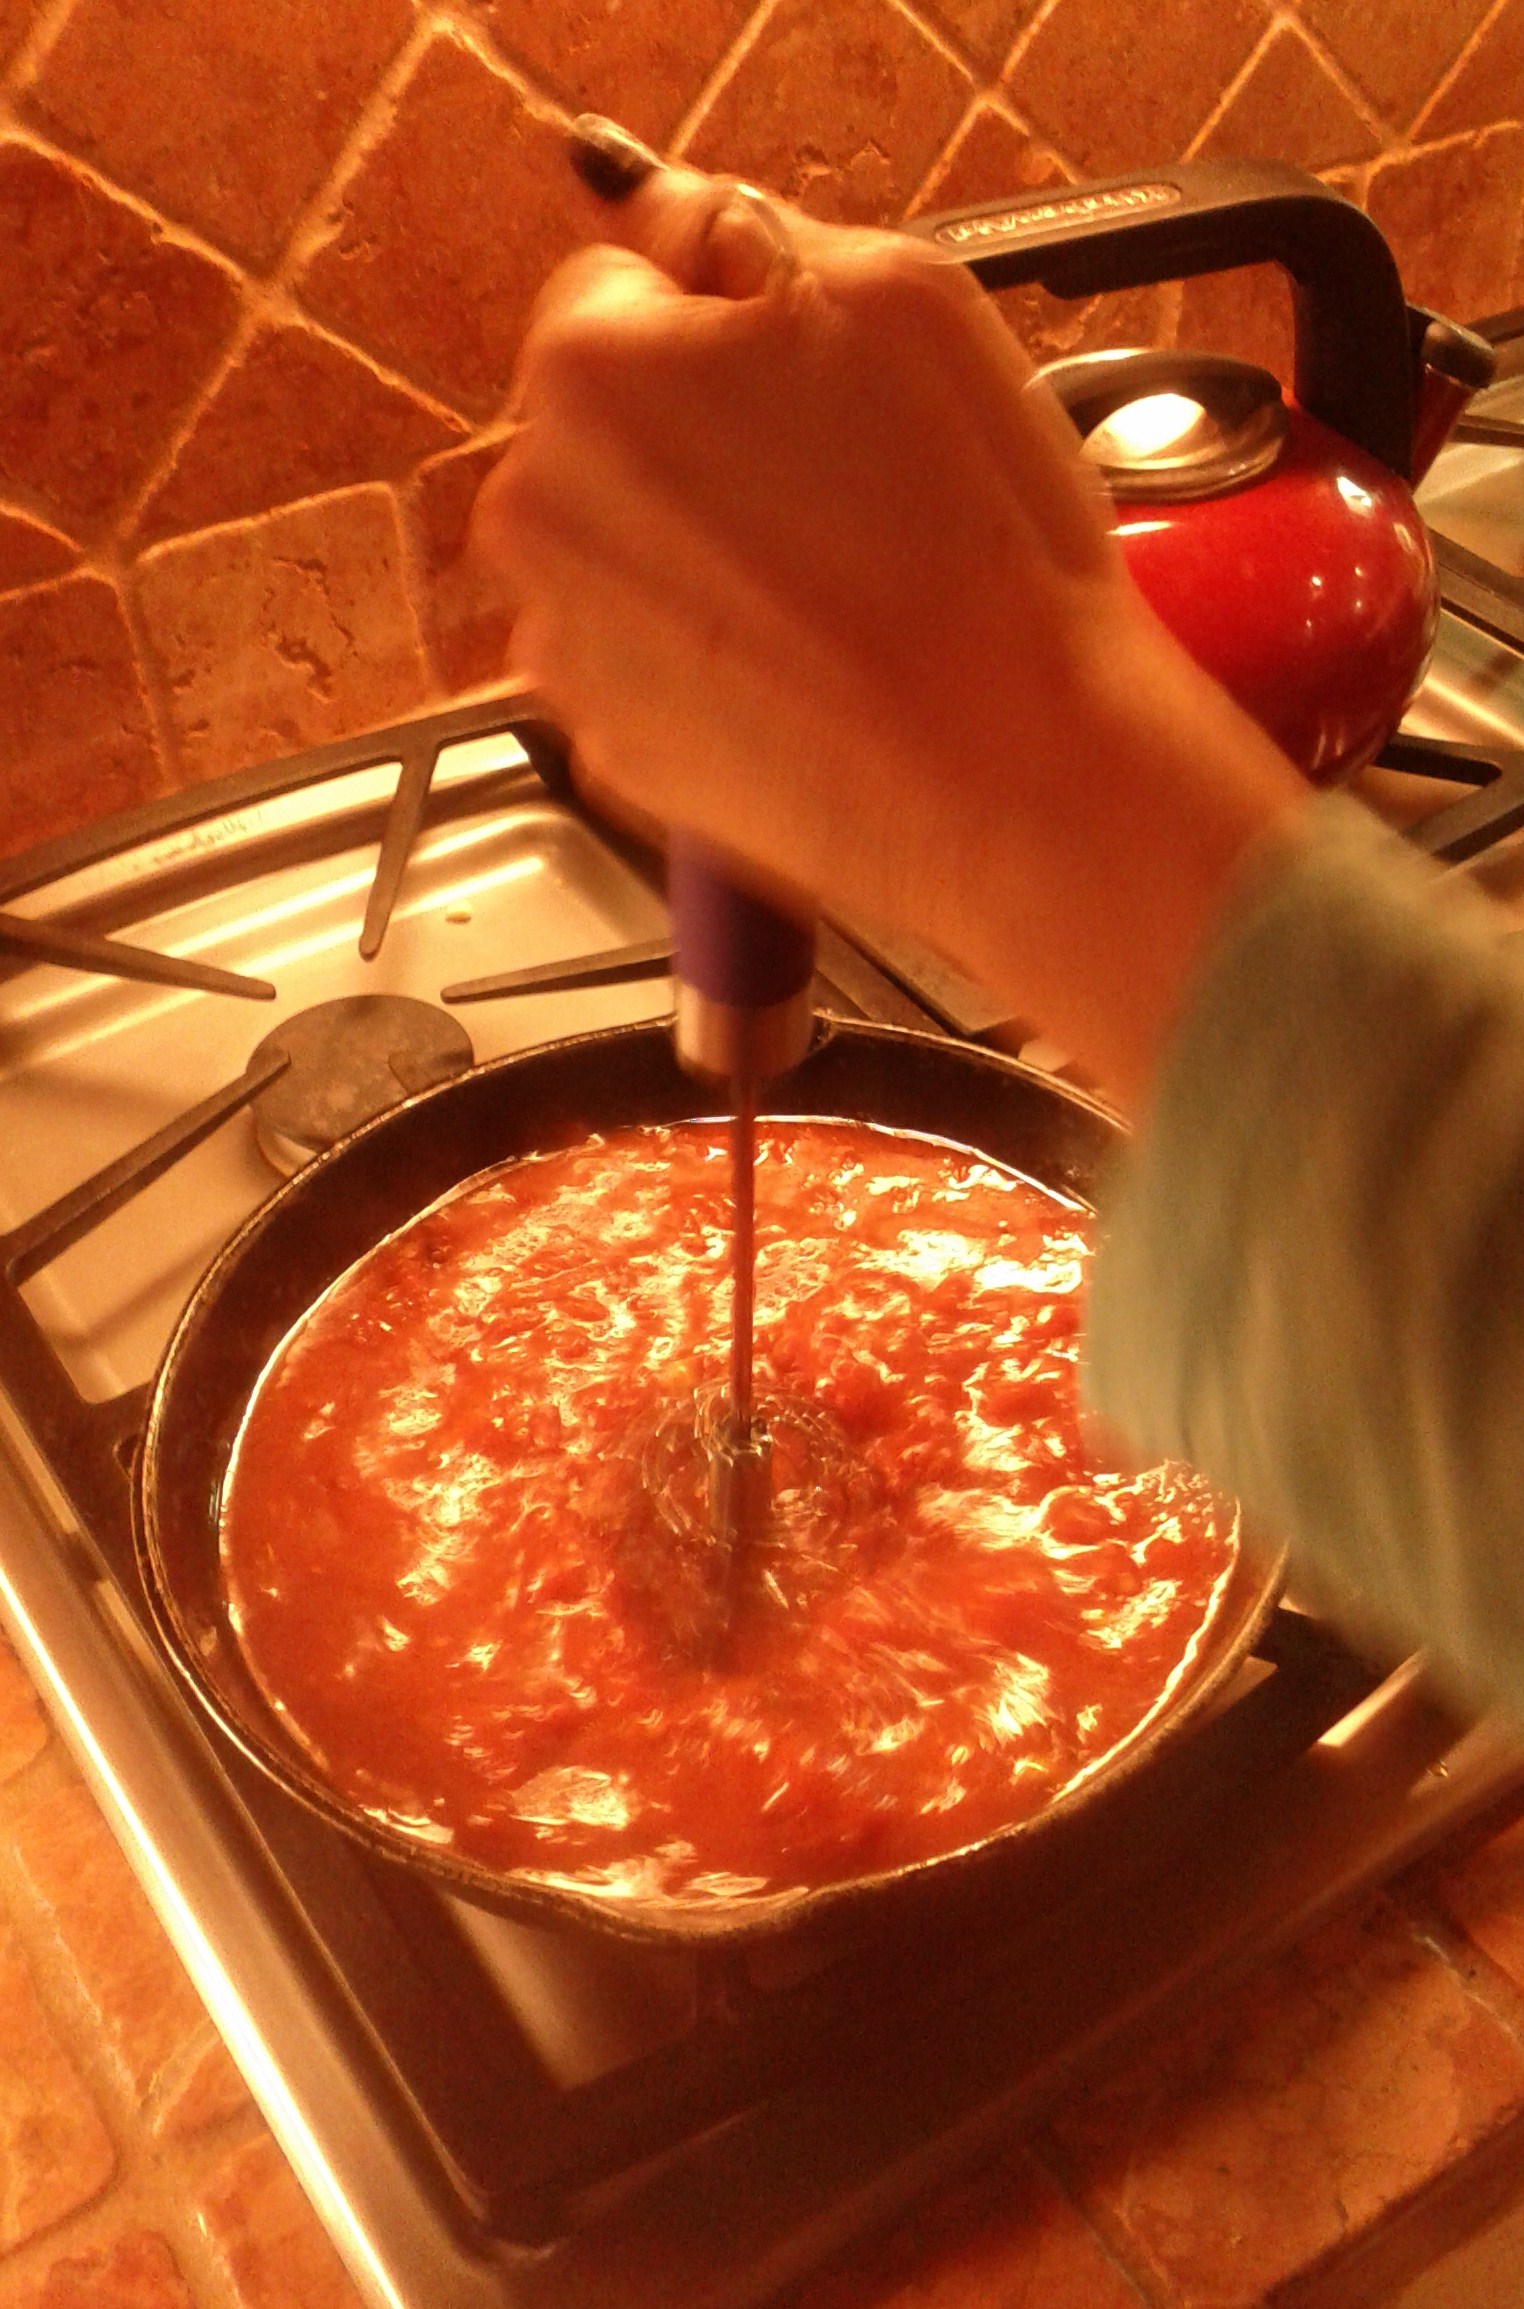
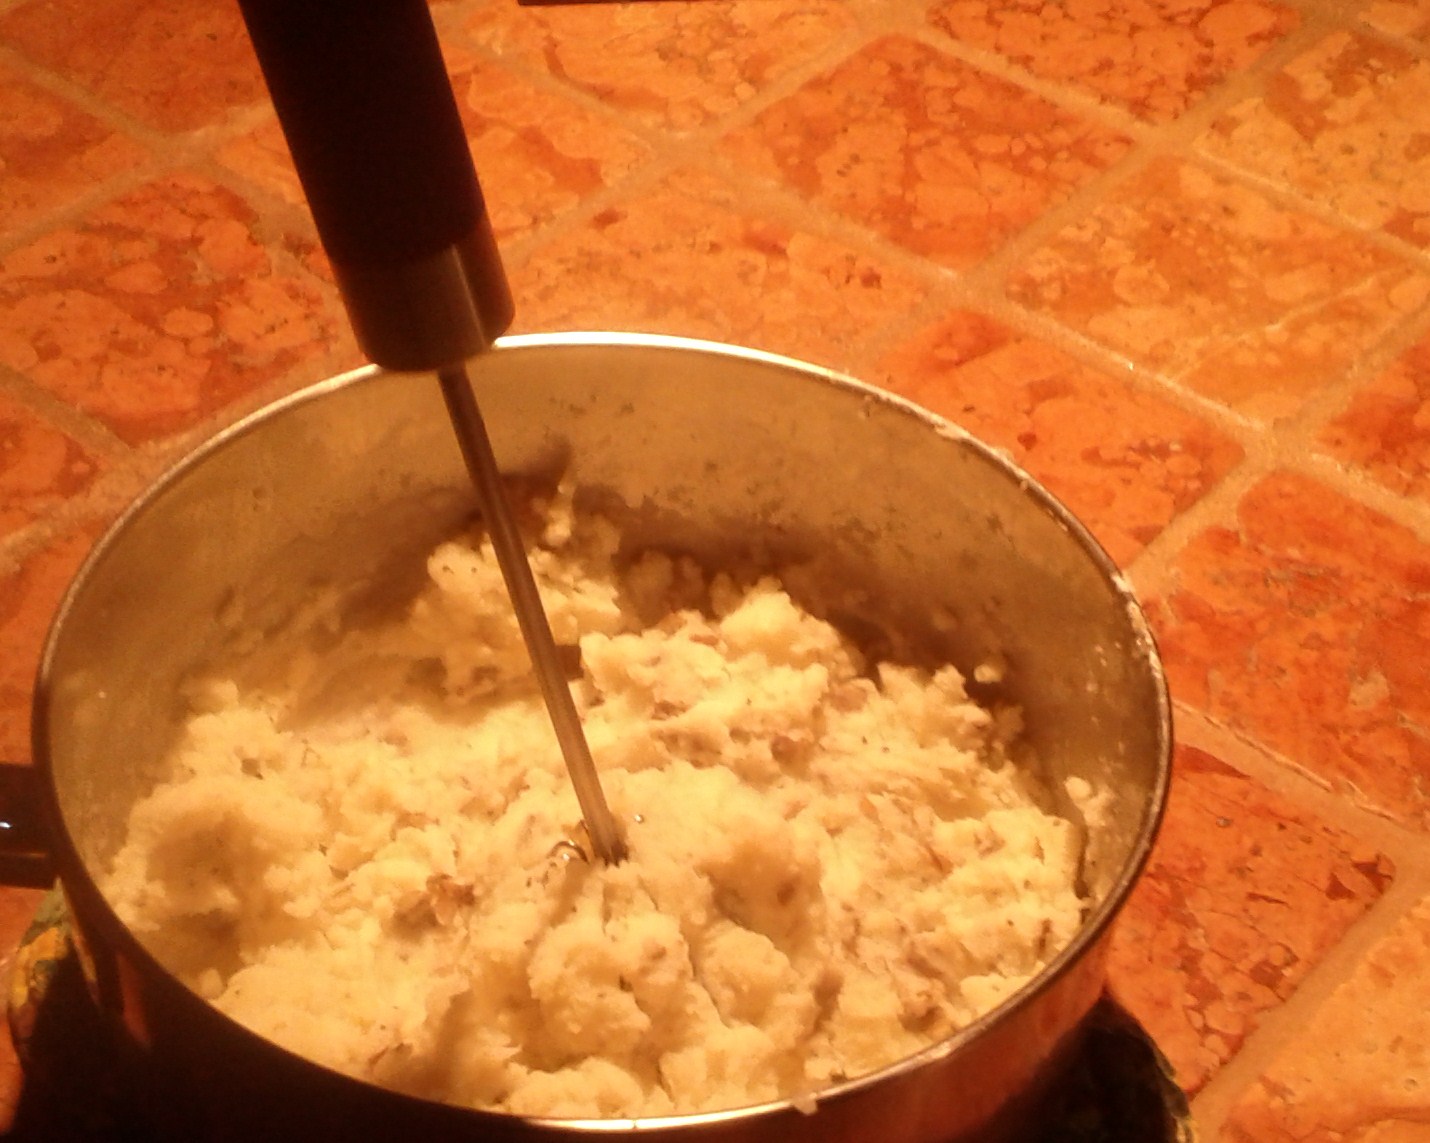
A friend gave me this Pogo whisk and I love it. Before this I was mashing potatoes with an electric mixer which is kind of messy. This works just as well and you only have to push down on the handle – it does the work for you. I also use it for smoothing sauces, soups & frothing milk for making lattes. Genius.
spaghetti sauce or soupsmashed potatoesfroth for lattesfruit and vegetable peeler especially good for soft skin fruit.The best lemon & lime zester. The bottom part contains the zest – no mess.
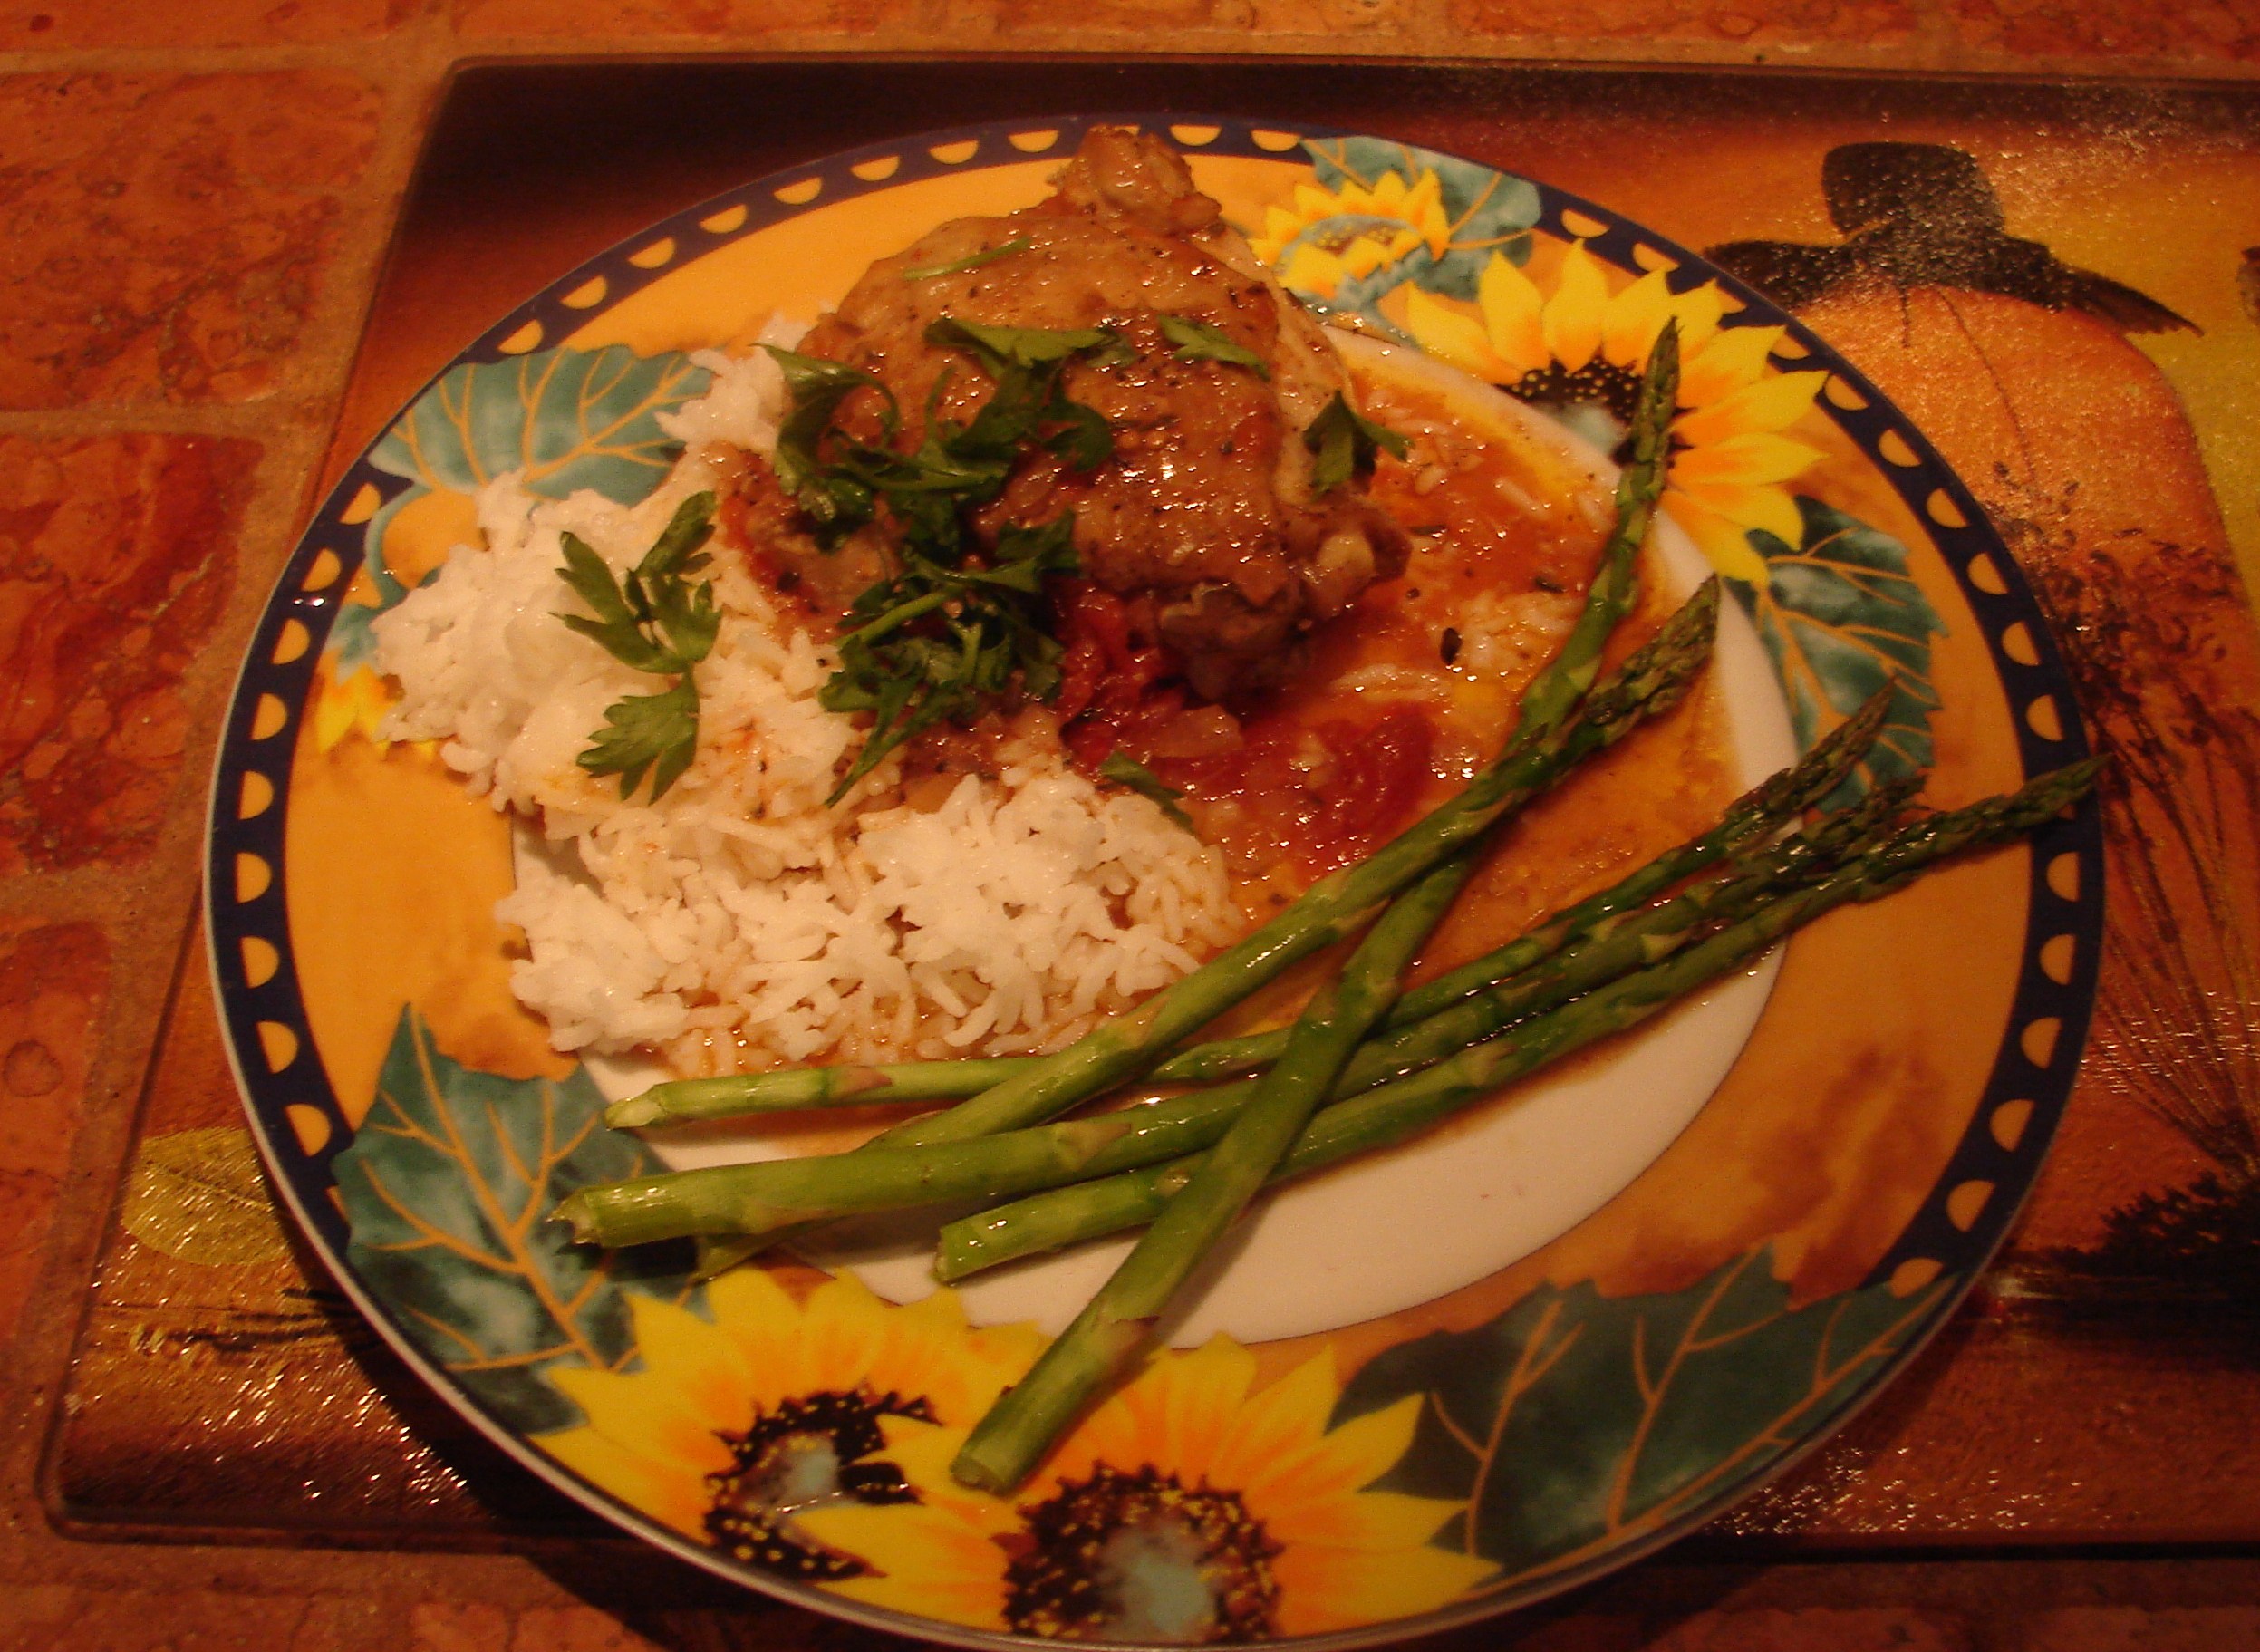
This delightfully tangy rich recipe is inspired by chef Jean-Georges Vongerichten’s (of “Marketplace” at the Shangrila) recipe for vinegar chicken. He suggests seasoning the chicken with salt a day in advance. Serves six.
3-4 lbs. bone-in chicken pieces, preferably dark meat (like thighs).
2 ½ tsp. kosher salt, divided
½ tsp. fresh ground pepper
1 ½ Tbsp. extra-virgin olive oil
1/3 cup finely chopped shallots
1 ½ cups red wine vinegar (I substituted about half the vinegar amount for *red wine used for cooking purposes).
1 cup chicken broth
2 Tbsp. tomato paste
1 cup canned whole peeled plum tomatoes, drained and quartered
6 cloves of garlic
4 sprigs of thyme
3 bay leaves
2 Tbsp. finely chopped parsley
Preheat oven to 300. Season chicken with 2 tsp. salt and pepper. Heat oil in a 5-to-6 quart Dutch oven or wide, ovenproof pot over medium-high heat. Brown the chicken by arranging half the chicken in pot in a single layer and cook, turning once, until golden brown, 12-15 minutes. Transfer to a plate and repeat with remaining chicken
Add shallots and cook, stirring occasionally, until golden, about 2 minutes. Add vinegar and cook until much of the acrid aroma has dissipated, 3 to 5 minutes. Add broth and ½ cup water, bring to a vigorous simmer, and cook until slightly reduced, 3 to 5 minutes
Whisk in tomato paste and remaining ½ tsp. salt. Add tomatoes, then arrange chicken in pot, skin side up, pouring over any accumulated juices from plate. Tuck garlic, thyme, and bay leaves in liquid. Cover pot snugly with foil, then lid, and transfer to oven. Cook 1 hour and 15 minutes, until chicken is very tender.
Let rest 30 minutes; discard thyme and bay leaves. Scatter parsley and serve.
*I always keep a vacumized bottle of wine aside for cooking purposes. Usually it’s one I’m not so crazy about drinking so it comes in handy for recipes such as this one or in a hearty Bolognese sauce or Beef Bourgignon. More recipes with wine to follow. Of course I always drink a glass while cooking.
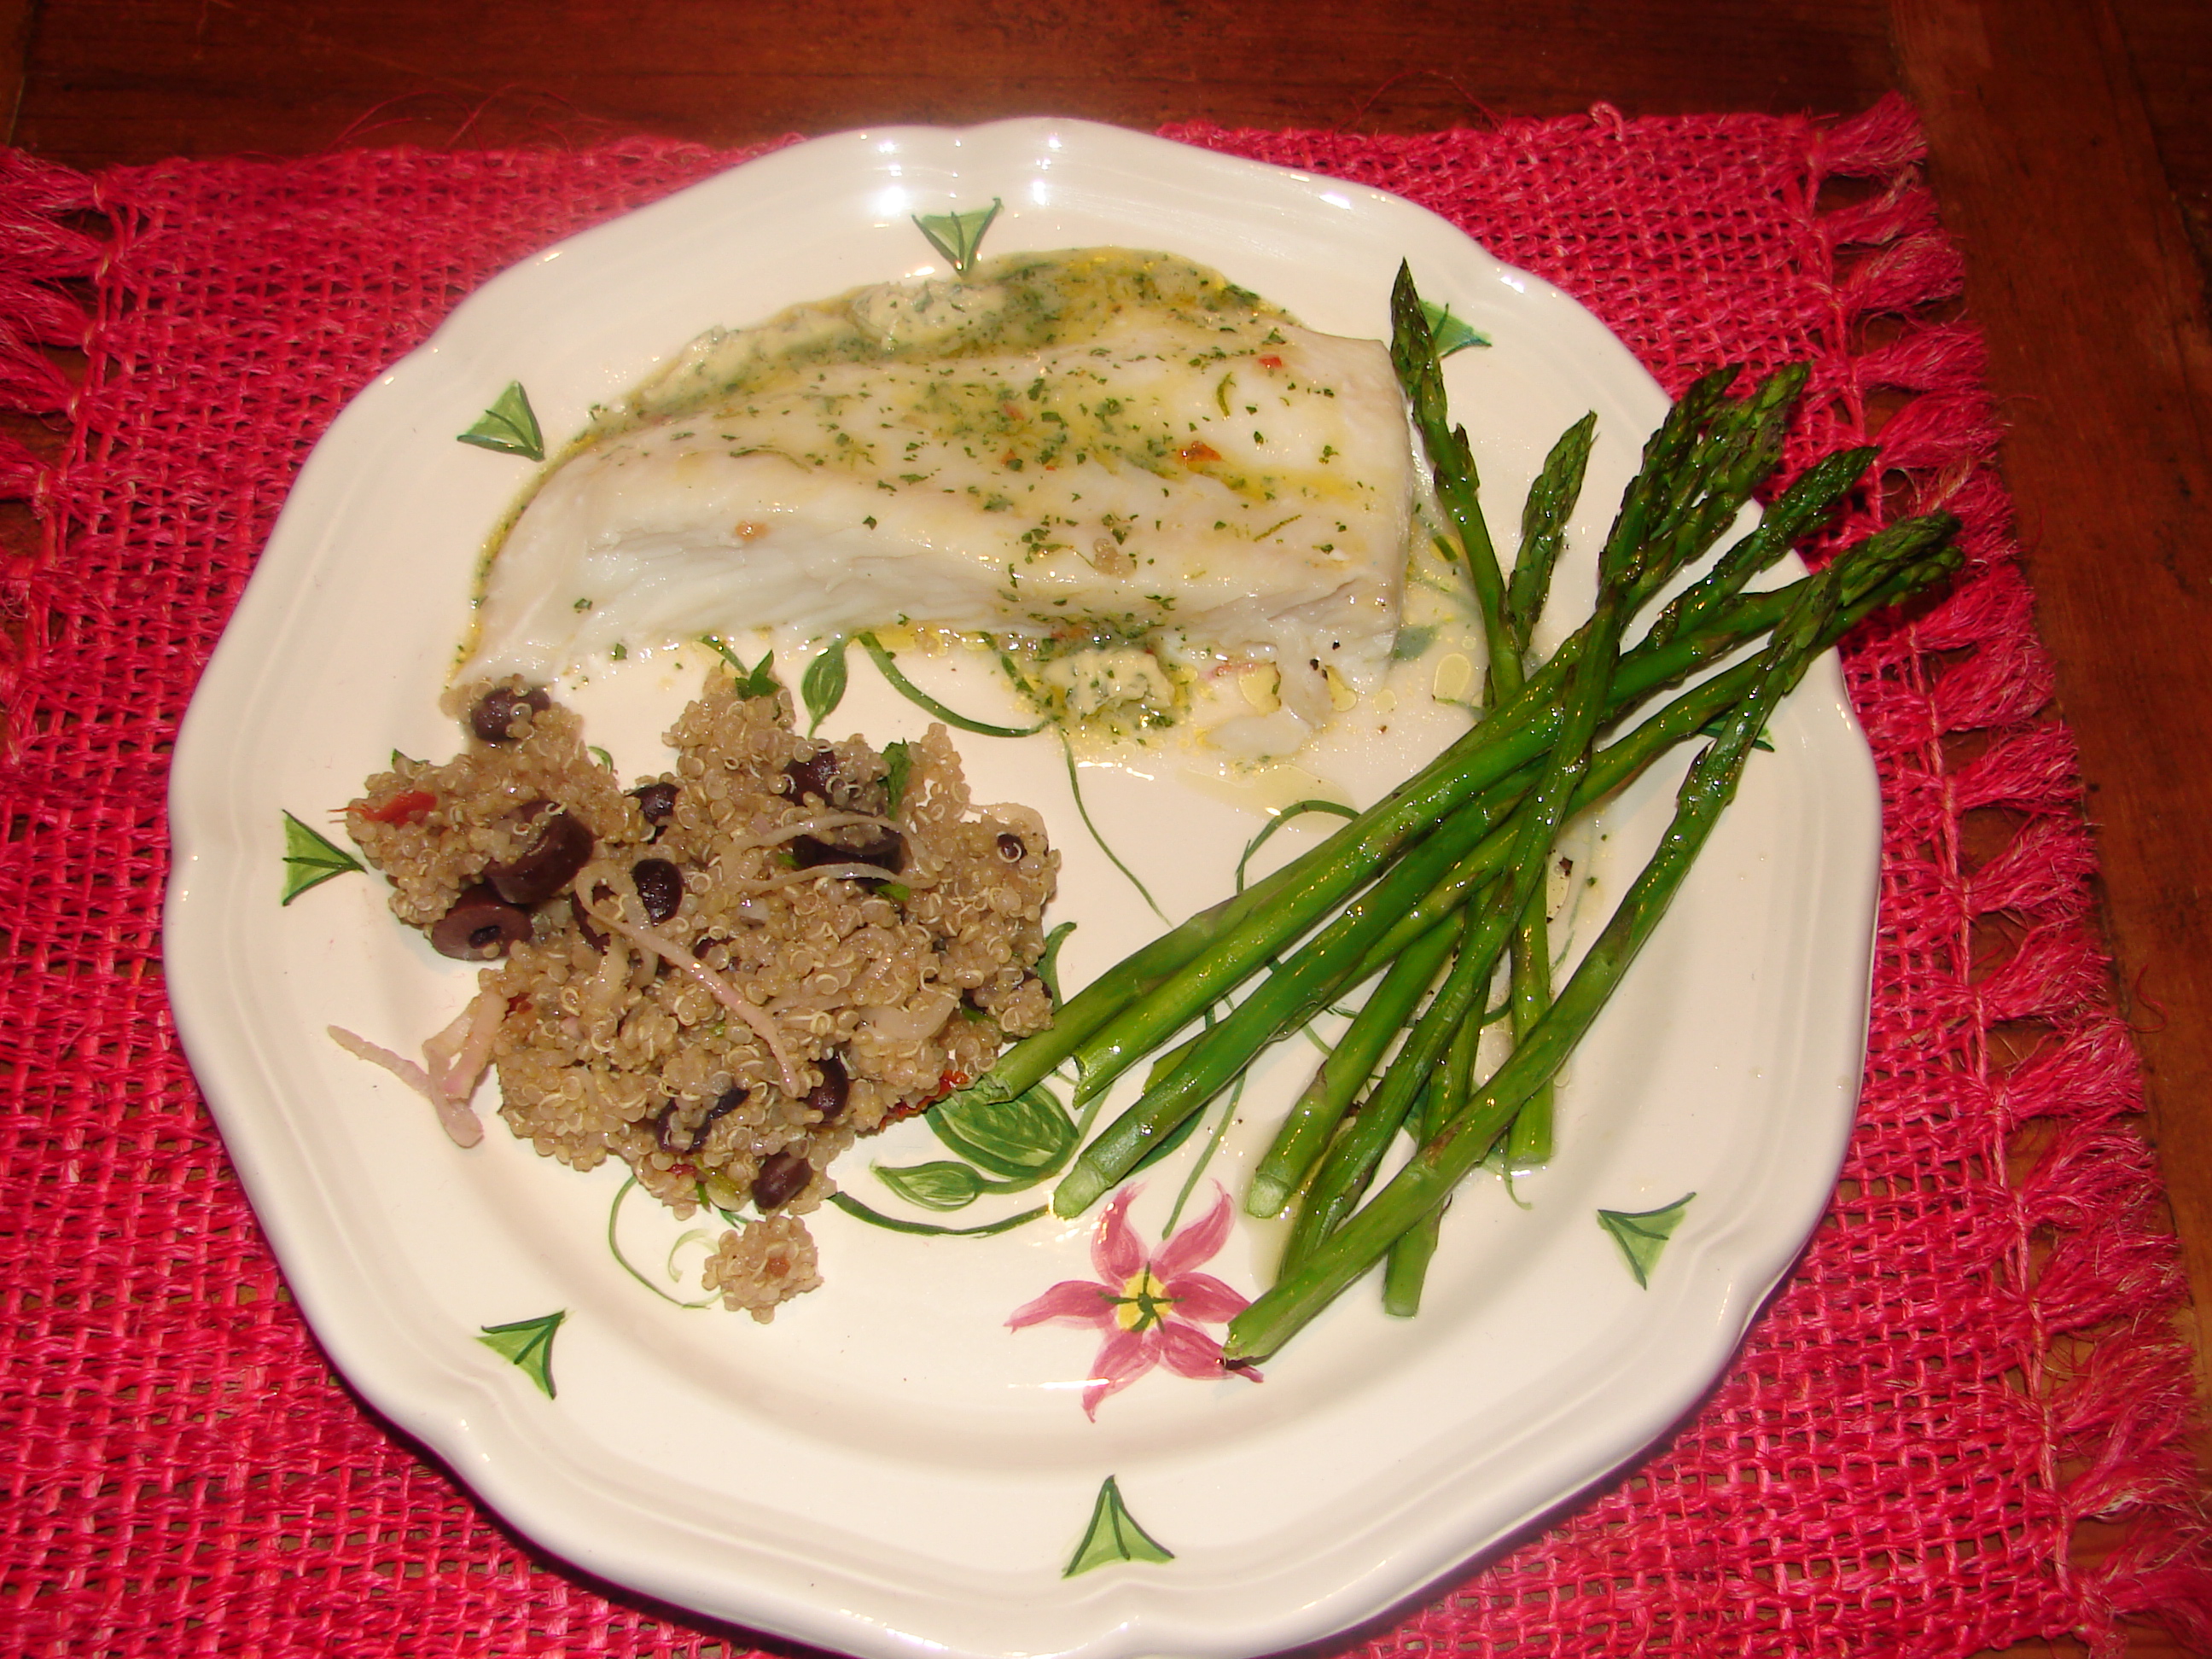
This recipeis so simple yet so incredible. I ended up freezing the butter I did not end up using for next time – you can adjust the quantity. If you can’t find halibut then use another type of solid white fish similar to halibut which is light and mild with a slightly sweet flavour. Serves 4.
4 halibut fillets
1 tsp kosher salt
8 Tbsp. unsalted butter, softened
2 Tbsp. fresh cilantro, chopped
2 Tbsp. sweet chile sauce (I use Thai)
1 Tbsp. fresh limejuice
zest from 1 lime
Set the oven temperature to 375
In a small food processor combine butter, sweet chilli sauce, cilantro, lime juice and lime zest. Set aside.
Season the halibuts with salt.
Place on a baking sheet (like Pyrex) and bake until done – approx. 15 minutes or until fish is opaque and starts to flake. You can also grill this.
Remove the halibut from the oven (or grill) and serve with the clilanto-sweet chilli-lime butter generously dolloped over top. It will melt in to form a rich flavorful sauce. Serve with sides like rice and asparagus or green beans. In Photo: Quinoa cooked with black beans, shallots & red pepper and Asparagus drizzled with vinaigrette of olive, white truffle oil & champagne vinegar (from last week’s recipe).
A perfect wine pairing – crisp Chardonnay.
Halibut is in season normally from April to November. It’s a great source of protein and vitamin B3. It is also high in omega-3 fatty acids. It lends itself easily to different sauces.
How to know if fish is fresh:
1)Look them in the eye if you can. Clear, bright eyes are signs of the freshest fish; the eyes of a less fresh fish will be dull of greying.
2)If the fish still has its skin on it, check it for shine and brightness. A fresh fish should look metallic and clean. Dull or discolored scales could be a sign of a less fresh one.
3)It should not smell fishy. An overwhelmingly strong smell is a sign that the fish is past its prime.
4)If the fish is in fillets, press your finger gently against the flesh. The indentation should disappear quickly as the fish springs back into form. A lasting indentation could mean the fish is no longer good.
5)The flesh of the fish should be moist and not spongy. Fish that is yellowing or discolored is past its best before date.
RECIPE below. Truffles are a type of subterranean (it sounds alien like) mushroom. Truffles are difficult to find and very expensive as a result! Therefore the oil seems like a less expensive option. I prefer white because it’s not as strong as the black version.
I like this from Alba -approx. $25.00
Truffle oil is a finishing oil not a cooking oil. Truffle oil is created when truffles are soaked (infused) in olive oil & used to enhance foods by adding it after preparation. Before commercial truffle oil was introduced in the 1980s, chefs in Italy and France traditionally made their own by steeping tiny bits of fresh truffles in high-quality olive oil. You can buy a truffle oil for as little as $12 but the best ones will run you a bit more. Prices vary.
Things I’ve grown to love about truffle oil:
First off that it reminds me of something else I really love – truffles (I mean the chocolate variety especially laden with alcohol). I love the word truffle – it sounds fluffy.
A little goes a LONG way. One bottle will last months.
How putting a little on your veggie sandwich or eggs brings on a whole new flavor.
How topping your pasta with the oil makes it just perfect.
How topping your grilled steak with it makes it “just what the doctor ordered” (minus the fat).
How topping your pork chop or roast makes it ideal as you can then use less mushrooms which are wonderful with pork. I think you get the picture!
The ingredients to make the truffle oils are cold-pressed and not chemically treated. This means smaller batches of truffle oils are made, and the oils are rarely processed by heat.
I have one tiny dislike about them – the fact that they use pigs to sniff them out – it sounds dirty.A hunter will use a staff to force the pig to back off, once the pig has located a truffle. Can you imagine doing all that work and not getting a piece of the action?They use dogs too because dogs apparently love truffles. I think they should reward the animal used with at least one truffle treat – I would give them more before saying “that’s enough now, we need to make oil.”
Cost: White truffles cost from about $1000 to over $2000 a pound, and black truffles cost from $300 to over $600 a pound. This is approximately what the better eateries have to pay to get them. Don’t expect to be seeing them in the produce department of your neighborhood grocery store anytime soon…or ever.
Truffle Trivia: Let the dogs do the trick. In Italy, truffle dogs are trained in several steps. First, the dog is taught to retrieve a rubber ball. Next, a small bit of smelly Gorgonzola cheese is substituted for the rubber ball. After the dog has learned to retrieve the cheese, the cheese is hidden, forcing the dog to sniff it out for a reward of food. Finally, a small truffle is substituted for the cheese. The dog is trained to fetch, then dig up the truffle.
What about you? How do you use truffle oil? Do you prefer black or white?
Asparagus with White Truffle Oil Vinaigrette
Ingredients:
2 pounds asparagus
For the White Truffle Oil Vinaigrette:
2 Tablespoons White Truffle Oil
1.5 Tablespoons Extra Virgin Olive Oil
1 Tablespoon Champagne Vinegar
1/4 teaspoon freshly squeezed lemon juice
1/2 teaspoon (preferably Fleur de Sel or Maldon) Organic Sea Salt
Ground Black Pepper
Combine ingredients in a bowl and whisk. Gently steam asparagus until just cooked through. Plate and drizzle with the vinaigrette. Adjust salt and freshly ground pepper to taste. Serves 6-8.
You don’t have to be Italian to cook like one – although it helps!
Once again when “glamping” we try to keep it simple for obvious reasons while coming up with restaurant quality dishes as often as possible. This is one of them.
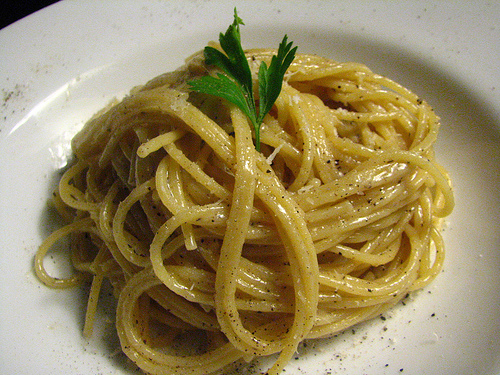
Don’t you love the elegant name of this dish – which is simply a glorified sounding Italian staple synomymous with Pecorino Romano – but Pecorino clumps when cooked. Add it at the end, instead, which also makes the most of its sharp flavor. Lemon adds spunk – that is, acidity and freshness. Before assembling please see note at bottom for the distinct differences when using Pecorino and Parmesan. I guarantee you will love this.
Recipe:
8 ounces thick spaghetti or linguine
½ stick unsalted butter, cut into 4 pieces, softened or at room temperature
2 ounces Grana Padano or Parmigiana Reggiano cheese grated (1 cup)
2 tsp. freshly cracked pepper (use a mortar and pestle or the coarsest setting on a grinder), plus more for garnish. Pepper flakes for finish (optional)
¾ ounce Pecorino Romano cheese, grated (1/4 cup)
1 small lemon (preferably Meyer)
High quality extra-virgin olive oil, for drizzling
1)The first thing is to undercook the pasta (al dente). Bring a large pot of generously salted water to a boil. Add pasta and cook until very al dente – about 2 minutes less than called for in package instructions. Reserve 1 cup pasta water before draining.
2)The key to a lush, silky sauce: Transfer pasta to a 12-inch skillet (preferably non-stick). Add butter and ¼ cup pasta water. Bring to a simmer over medium-high heat. The heat helps the starch in the water meld with the fat from the butter, which prevents the Parmesan cheese from becoming stringy in the finished dish.
3)Parmesan (either GP or PR): Reduce heat to low, and mix in whichever grated parmesan you chose with the cracked pepper. I use Parmigiano Reggiano in all my pasta dishes as a personal preference. Both are softer than Pecorino Romano. It will melt into the butter water, creating a sauce as the pasta finishes cooking.
4)Toss and Simmer with tongs to thoroughly coat it with the sauce. Keep everything at a gentle simmer just until the cheese melts and sauce thickens slightly, about 1 minute.
5) Pecorino and Zest: Remove from heat, then stir in the Pecorino Romano. Always add Pecorino off direct heat: it clumps when cooked. Zest lemon over the pasta to catch any extra. Any type will do but a Meyer is particularly nice in this dish. It’s sweeter in flavor and aroma, with back notes of orange and lime.
6)Finishing Touches: If pasta looks dry, toss it with a bit more pasta water until it has a glossy coating. Divide between 2 warm (preferably) bowls. Drizzle each with oil and lemon juice and garnish with more cracked pepper & red pepper flakes. Top with fresh basil leaves or flat-leaf parsley for added presentation. Serve immediately.
And know that sometimes the dishes with the least ingredients are also sometimes the most satisfying.
Parm vs Pecorino – these hard cheeses enhance nearly everything, making them both winners in the kitchen. Knowing their differences will make you a smarter shopper and a better cook.
Try to buy the block verses “already grated” unless you’re in a super hurry. Grated is more convenient so if you must then buy it from the refrigerated section. The blocks are more versatile as you can also shave it into salads. It can keep for several months wrapped in parchment and plastic. Bonus: when the cheese is gone, Parmesan’s rind can be used simmered into soups to add rich flavor.
Parmesan vs Pecorino Romano
Made from Cow’s Milk Sheep’s Milk
Rich, Nutty, Salty Sharp, Earthy, Robust
Pricey but worth the splurge A bit more budget friendly
Parmesan: domestic varieties are available but classic Parmigiano-Reggiano is made only in a certain region of Italy. A stamped rind lets you know it’s the real deal.
Pecorino: Feeling fancy? Go for Locatelli brand *Pecorino Romano, a famously delicious pick imported from Italy. *Use this strong cheese sparingly. To use in place of Parmesan use less than the recipe calls for.
“glamping” is a glamorized version of regular camping – camping with flair (plus I don’t like to sleep in a tent). But you can make this any old time.


 Have you ever used quinoa in a salad? If not, try this one. The combination of crunchy, soft, sweet & tart works really well here. This is a healthy AND delicious summer salad. It has a fresh flavor and the dressing has a sweet/sharp taste.
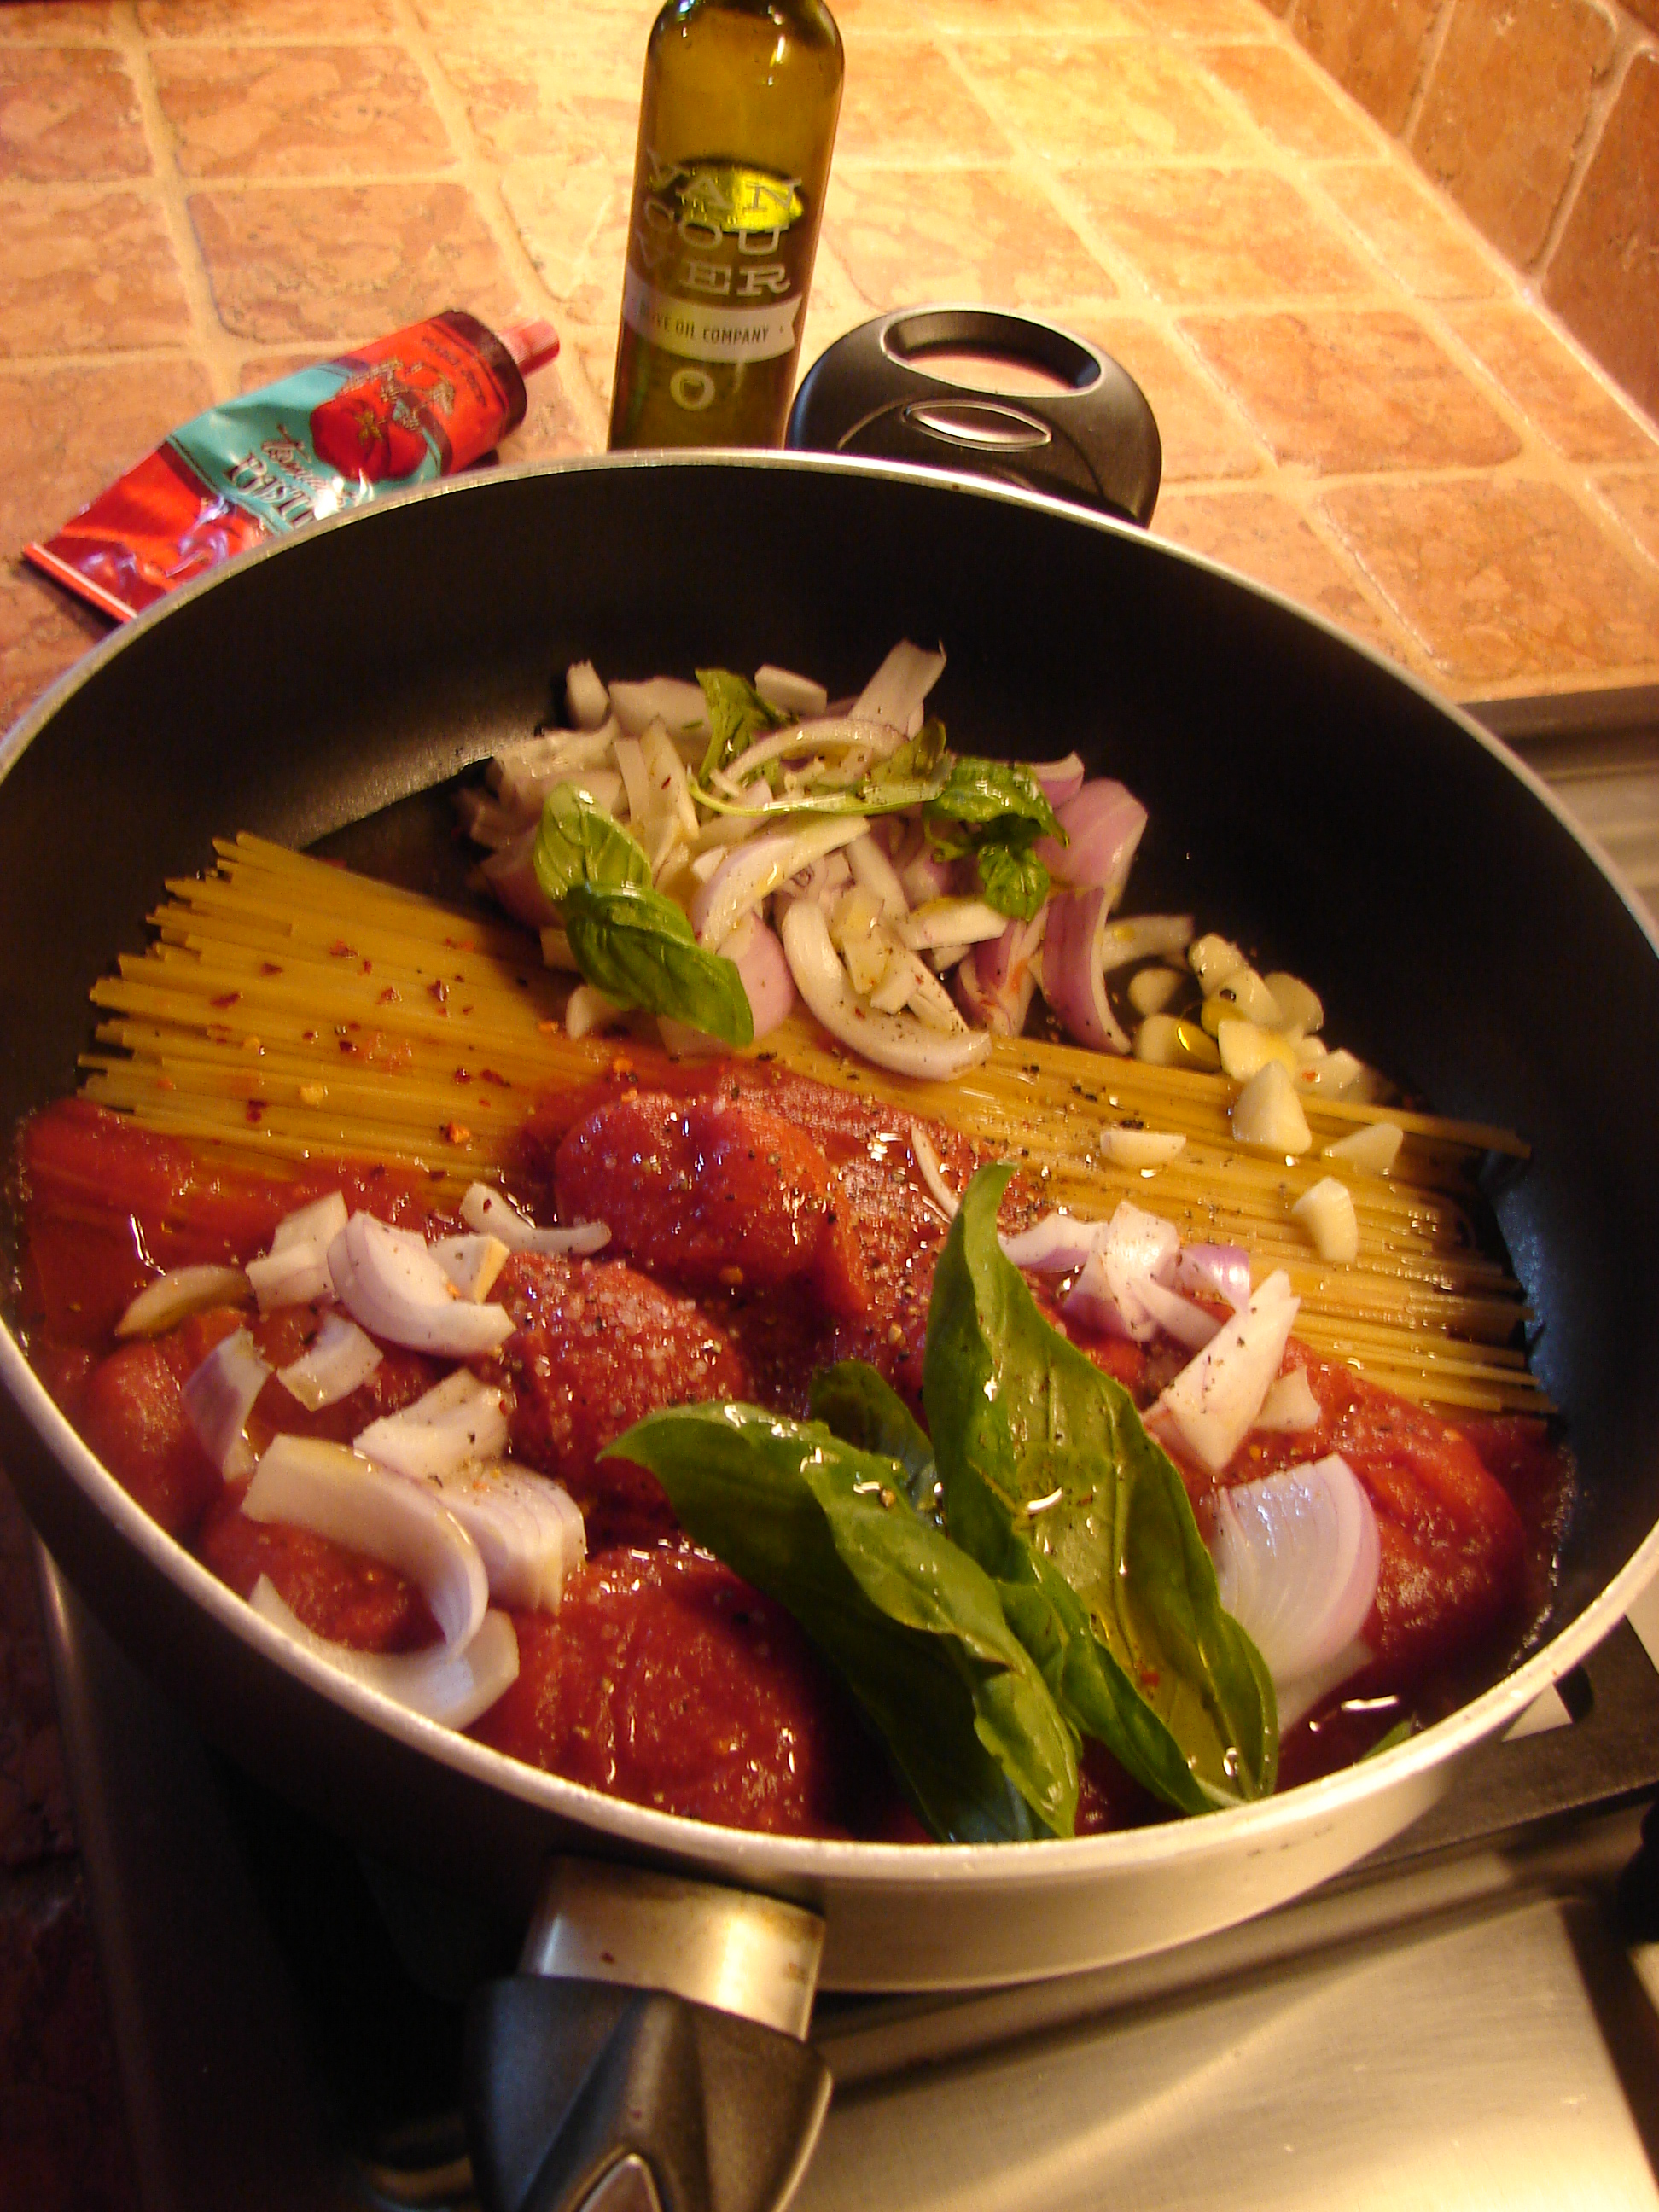


You must be logged in to post a comment.